In New Zealand many weddings are outdoors, often in locations 5 minutes walk from a car park or further. Besides weddings there are many other photo opportunities that require walking and moving from place to place - along with carrying all your gear!
My goal was to make a versatile kit which would actually include more gear but less carrying. I had tried a small hand-trolley but the hard rubber wheels made an awful sound on gravel that turned a lot of heads when I tried it the first time. It was very useful and the small wheels were really handy in preventing the handle having to rest on the ground in the muddy areas when we were shooting, but the hardness of the [small] wheels turned the metal box into a 'reverberating rumbling machine' when I wheeled it down the stone covered path and I think some people at the park thought they should head for cover due to the 'thunder' in the distance - until they saw where it was coming from. In some places I gave up and carried it on my back until we were past those trying to enjoy the serenity of the arboretum.

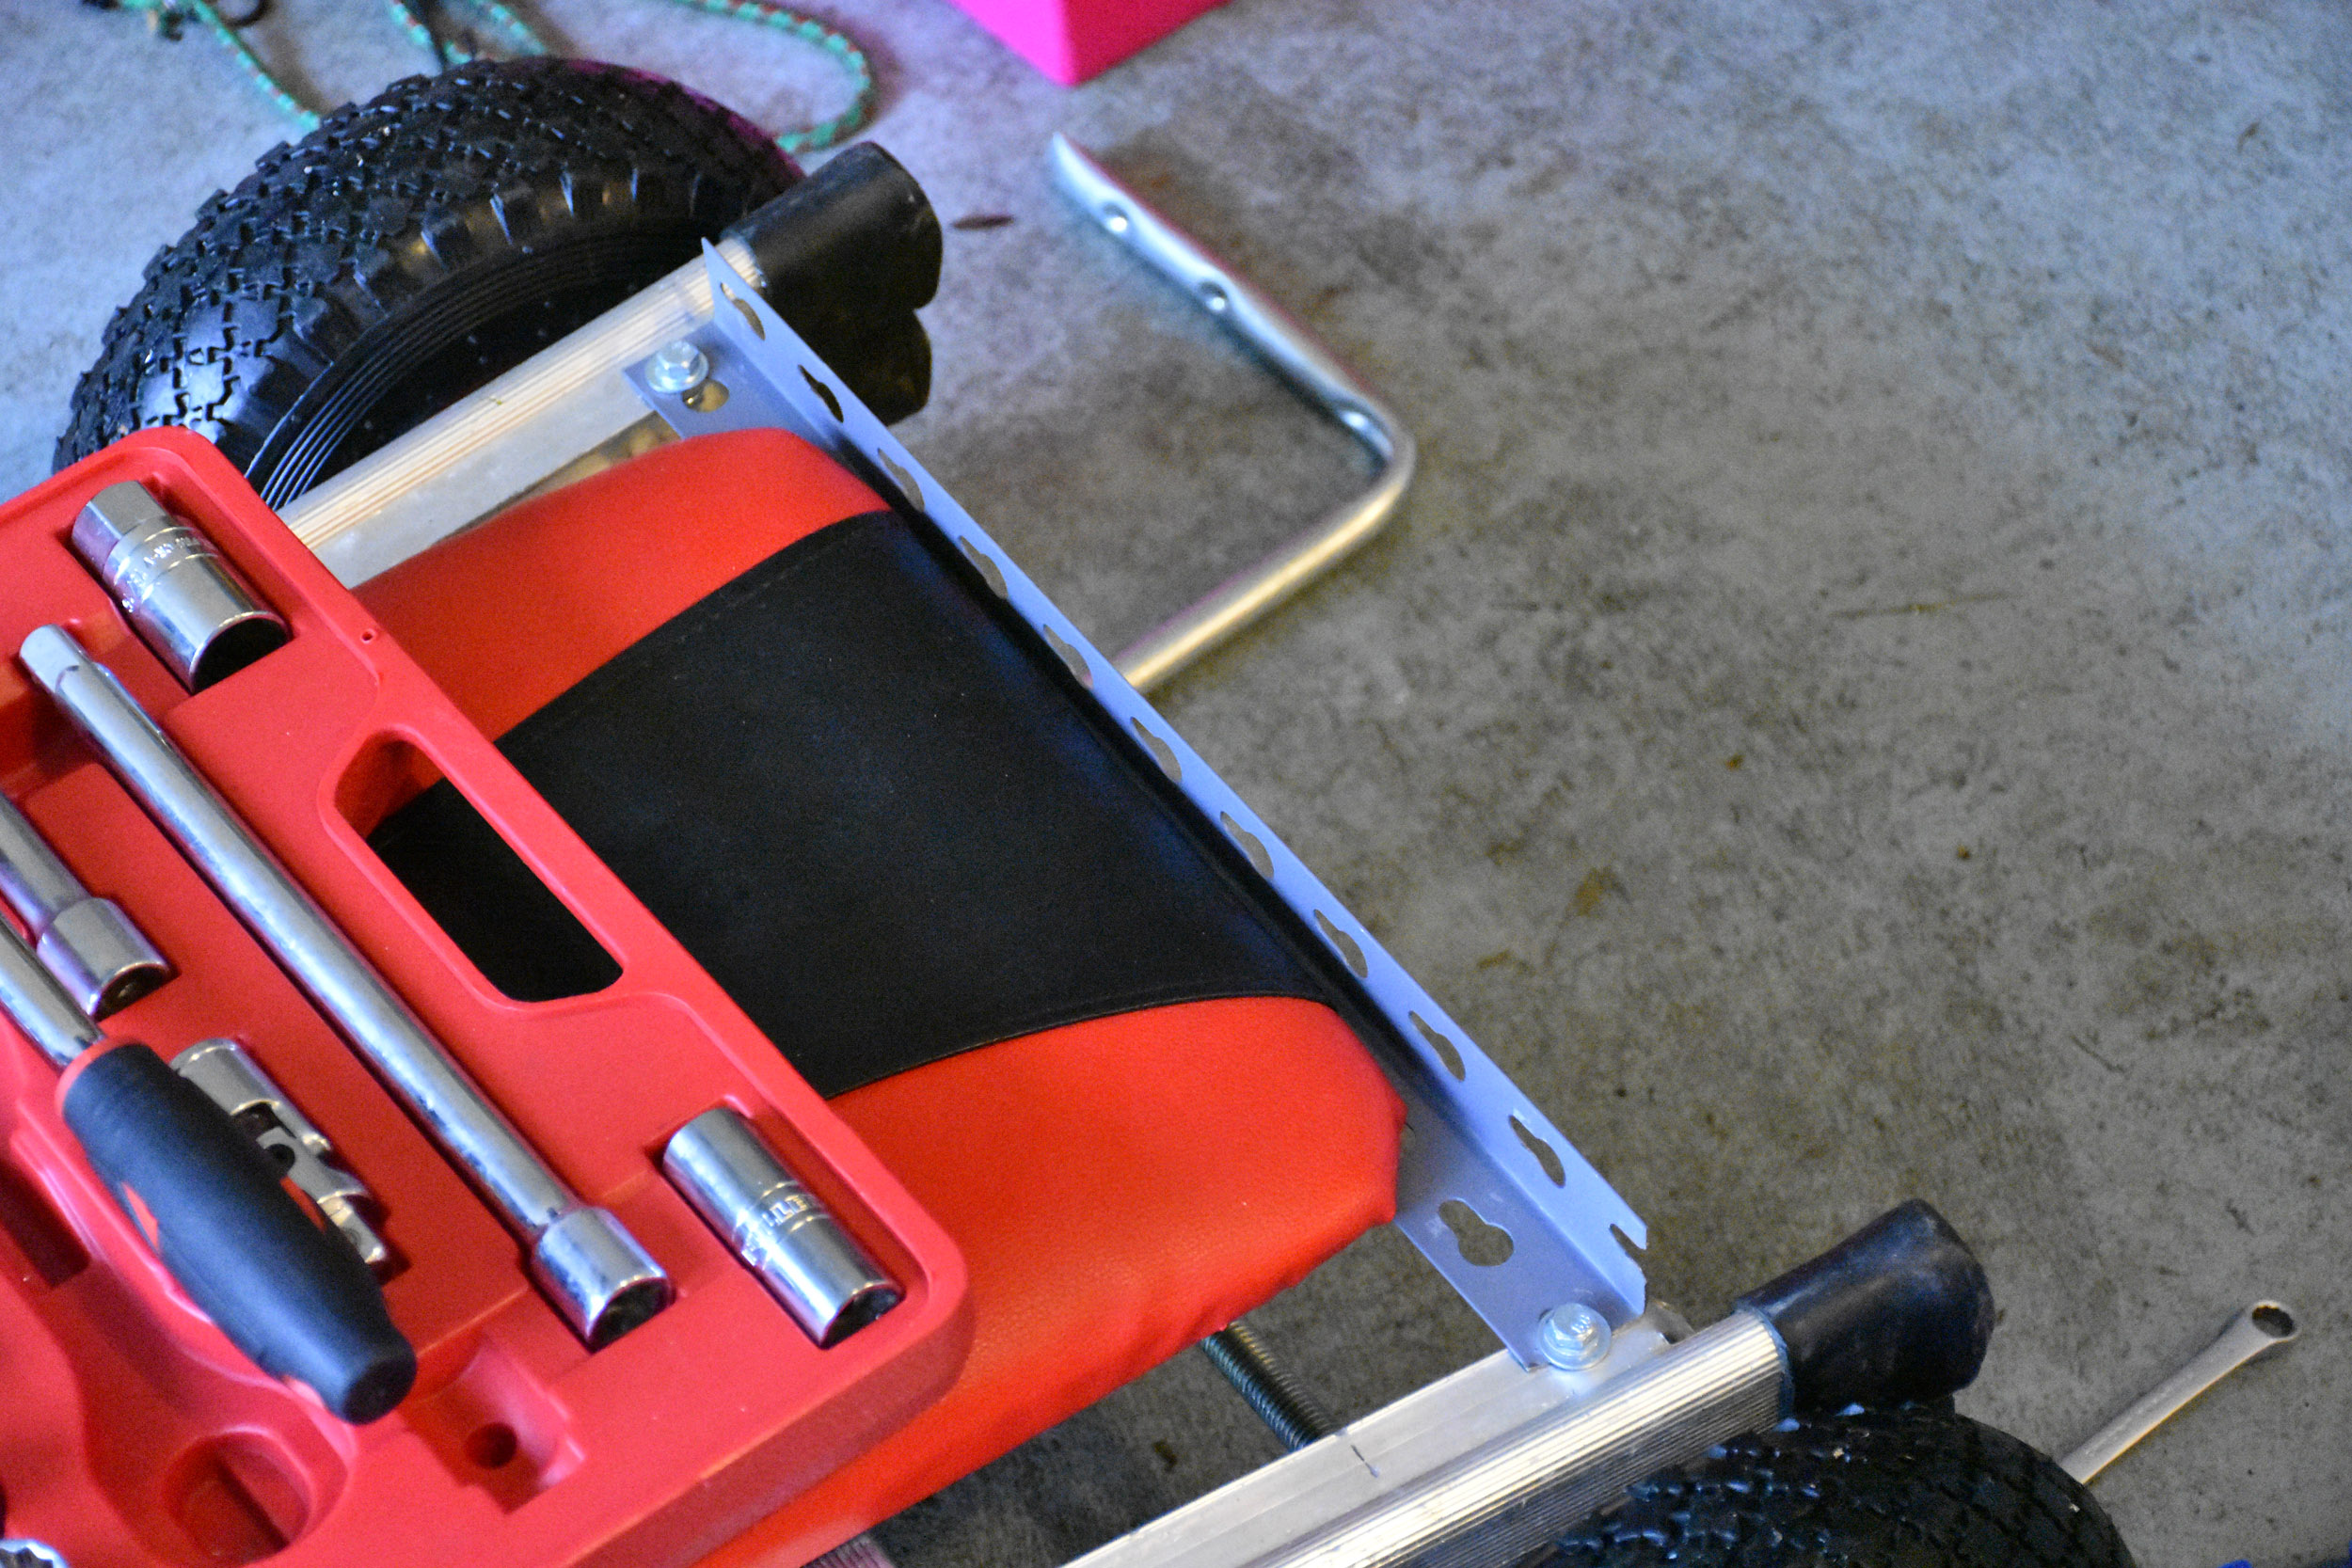
One of the problems with the box I had already bought for the hand trolley was that once a few camera bags were packed in it there wasn't much space for things like tripods and light stands. I didn't really want to go getting something much bigger than that. My solution was to modify a folding ladder which could serve as a trolley and a fast-set-up light stand at the same time. I chose an old ladder that had prevented my large toolbox from hitting the back of my head when my work van went into the side of a bus several years ago, but that's another story - here it is with the $20 set of pneumatic wheels with built in bearings for quieter [less thunderous] movement - I had to buy some longer threaded bar [$10] for the wheels because the bar that came with the kit was a little short for my project. Standing next to it is the el-cheapo ladder I originally bought but decided it didn't suit the task - but it is the exact length that can fit in the back of our Honda Stream which made it a useful measuring tool if nothing else.

I had set the ladder up then added the wheels so they were touching the ground to add stability to the ladder, because I would definitely be climbing it in future for better better vantage points for photos - it's always good to increase your options for creativity during photoshoots. Once it is folded the wheels are still at a perfectly useful distance to keep the ladder off the ground.
It all looked tidy enough but once folded up there was nowhere really comfortable to hold it while moving from one location to another - especially when walking for a few minutes. These things are always worth testing before doing an important shoot [I have a wedding coming up in two weeks involving a 5 minute walk to the location of the ceremony, then 5 minutes back to the reception venue]. It's like going for a hike in the mountains and slipping into your backpack the day before thinking 'everything's perfect' only to find that after walking for 15 minutes something is really starting to dig into your hips or back - or the clips on the cheap backpack you smugly showed off to 'someone who paid a lot for theirs' are coming undone when you move too suddenly. Always test everything for a reasonable amount of time before using it 'in practice'!
I found a spare attachment for our weights machine that was a duplicate and would never be needed - it had a nice "handle" on it so I cut it to suit.

A bit of drilling to make it fit and a few bolts in the right place and we now have a comfortable handle that gives more leverage to carry the weight.

For those who care to know these photos were taken with a D5200 and the Tamron 17-50mm lens.

The "pull down" bar that was modified has a rubber grip and is obviously designed for a reasonable amount of comfort while moving heavy weights making it a logical choice, even though it was realistically my only choice at the time. Nevertheless I think it turned out pretty well.

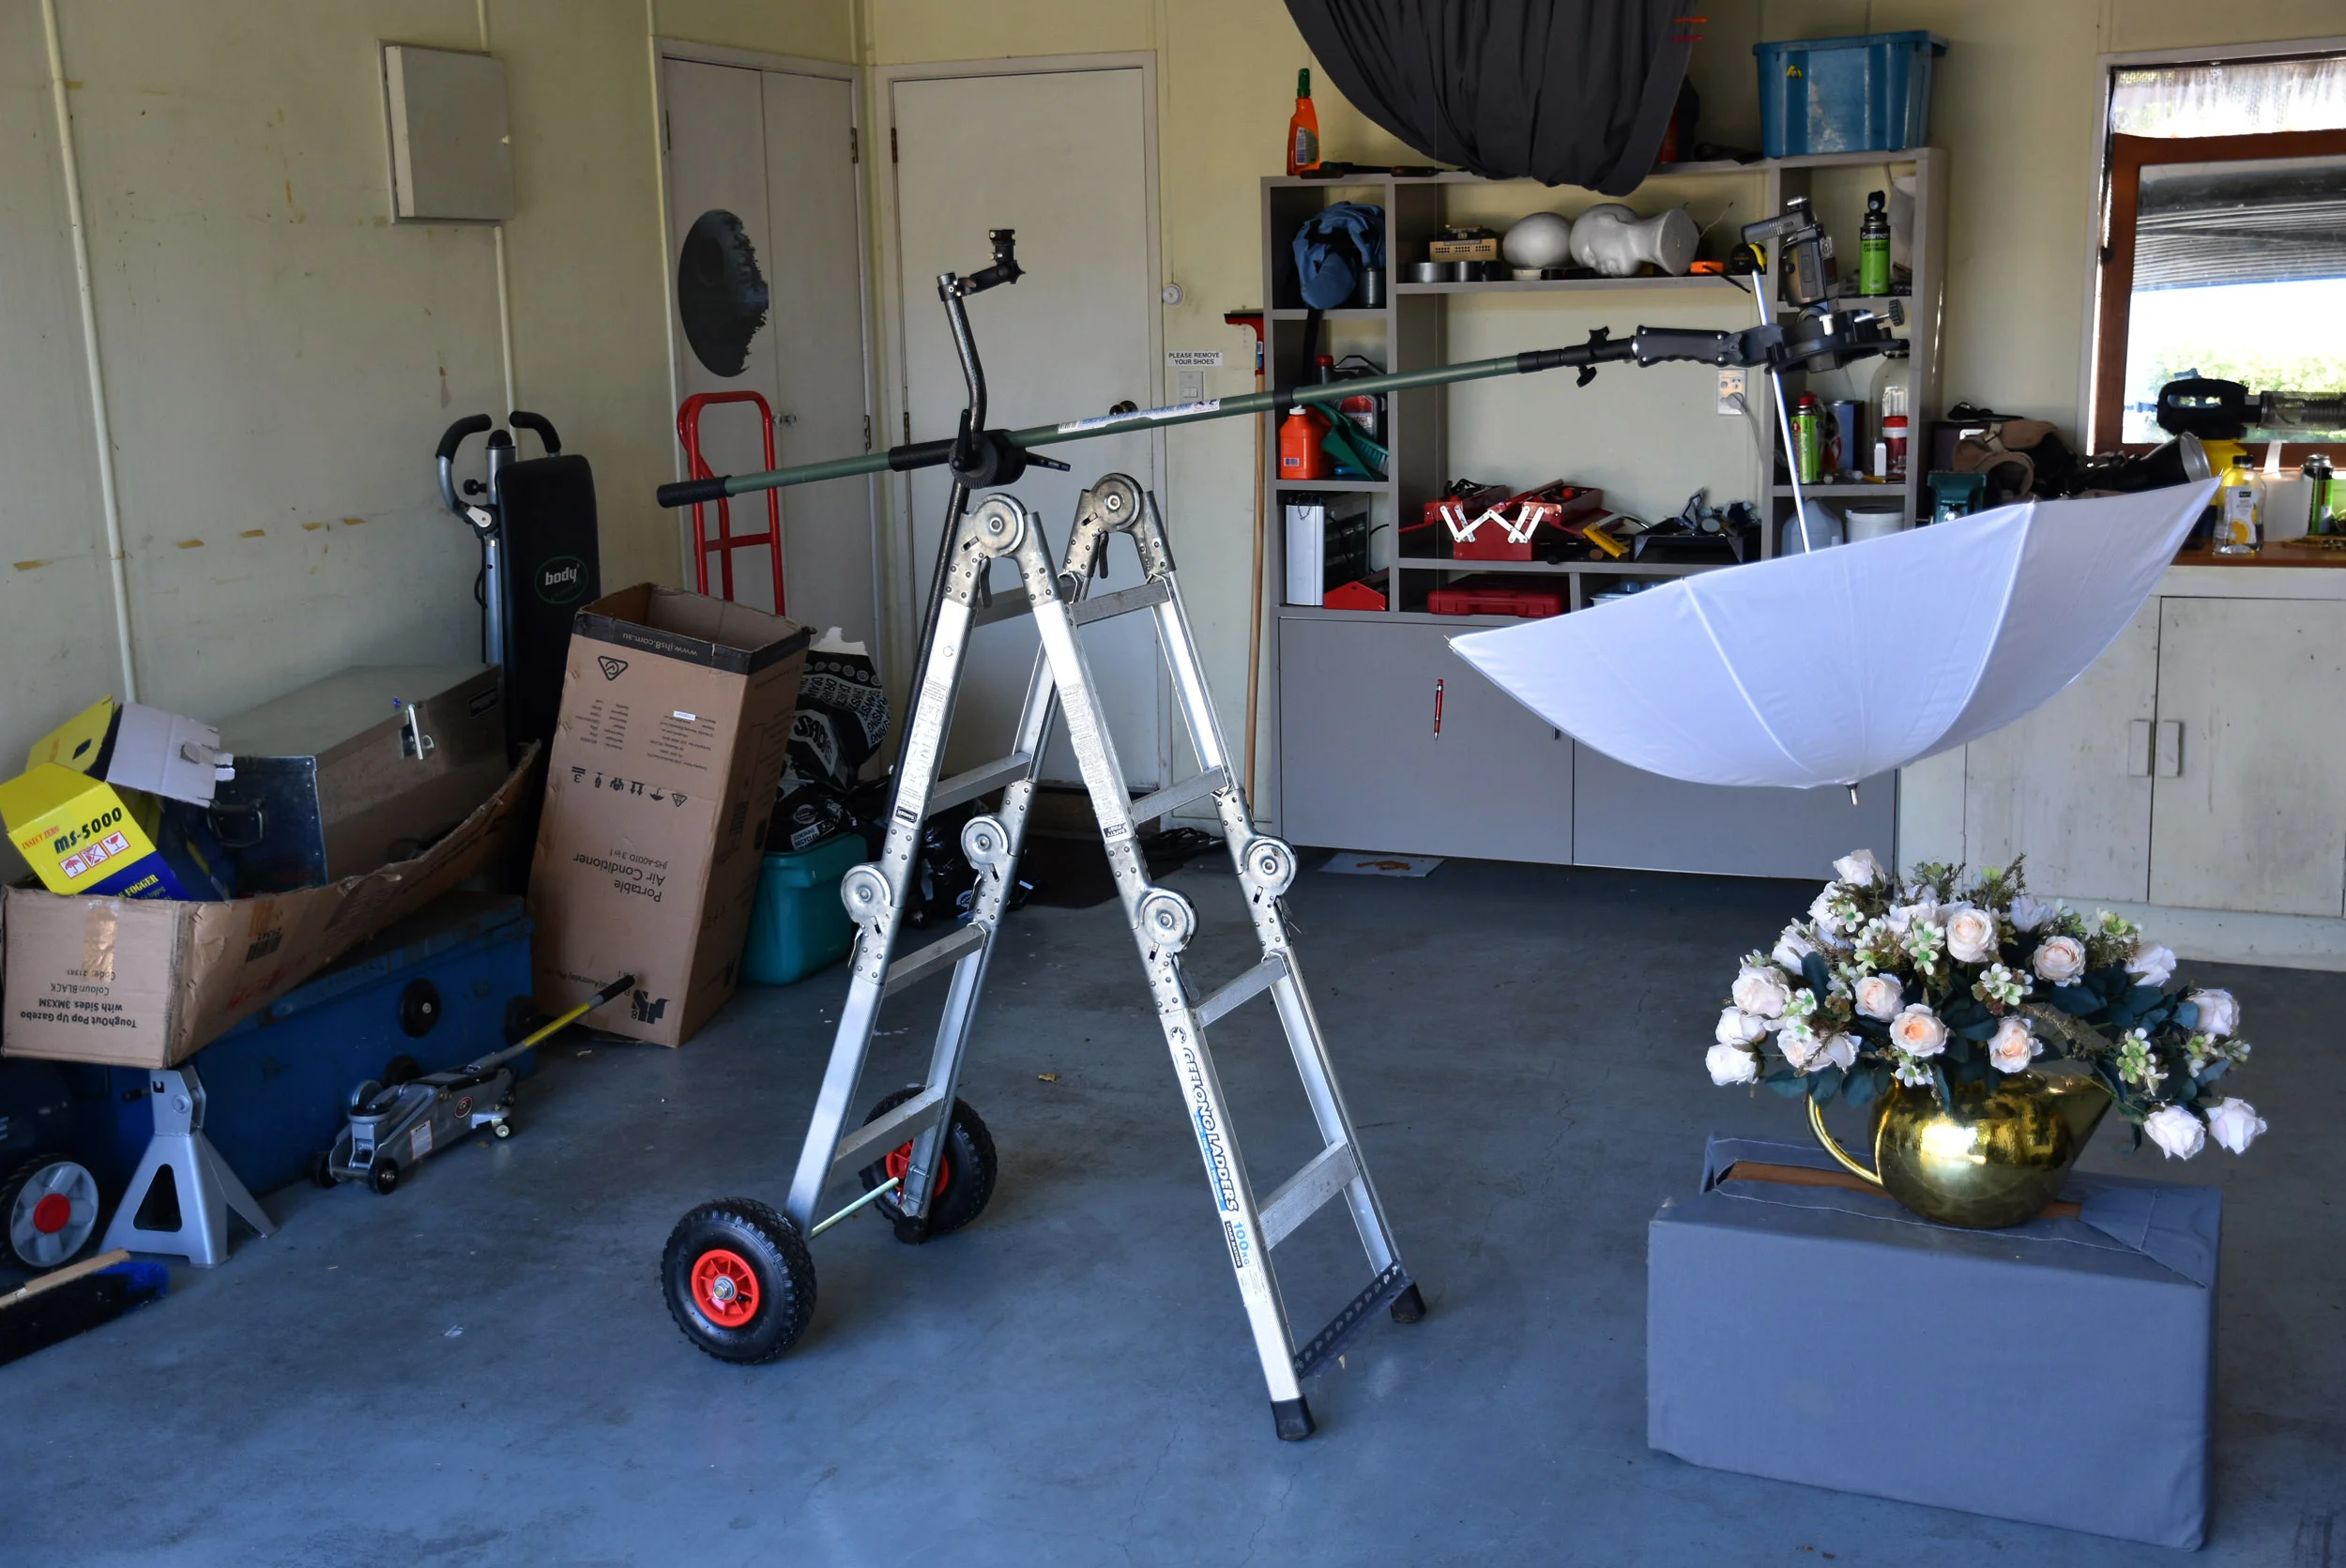
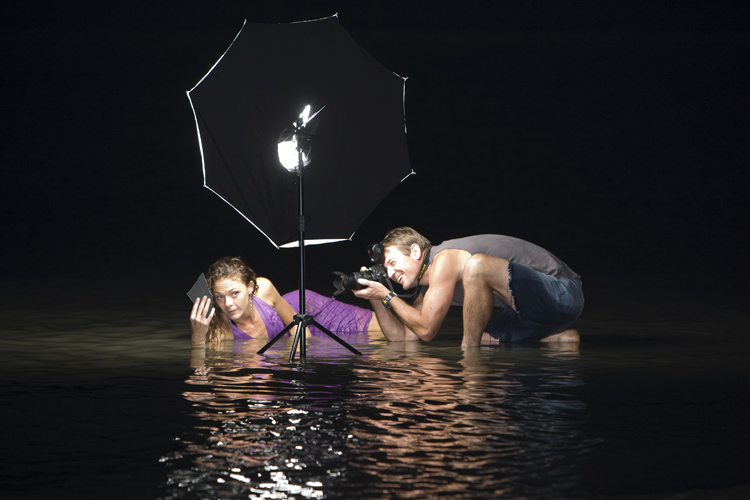
Ignore the fire extinguishers in the background, I sometimes photograph explosions in our microwave [before I blew it up with an airbag] so people generally either give me fire extinguishers for obvious reasons or microwave ovens to encourage me. Concentrate rather on the other attachments on the ladder that haven't been mentioned yet. As I said in the beginning I wanted it to be as functional as possible, so besides being a ladder that can get me elevated views of my subjects it is also sturdy enough to serve as an outdoor light stand - and only takes seconds to set up. The handle is the right size for a flash/umbrella clamp. Looking closely you will see that I also cut the end off the rubber handle so a light stand can also be inserted in it for more height.

And of course since there are two sturdy sides to the ladder it makes perfect sense to make use of both. I had a cheap light stand (that is not very sturdy) as a spare, pulled off its legs and duct taped it to the other side - now it adds to the usefulness of the photo-location-ladder and a flash can be mounted one side with an umbrella on the other side for perfectly central flash positioning.

I had initially dismissed the folding ladder as an option because the sides weren't flush - it has those "knee caps" sticking out in the middle which I thought would make mounting a box a nuisance. It turns out they are almost the perfect width to hold the box and prevent it slipping sideways! I will use stronger straps, maybe even put shelves in the box so it can be a 'cupboard' when the ladder is set up, but this is how it will look for now....

"Patent pending"! :D
That was all done on Saturday. Monday is a public holiday and it's pouring with rain so I decided to have a look at the box I will be using. Keeping in mind that it made quite a noise on the small hand-trolley when I used it last I wanted to make it is as pleasant to work with as possible, for myself and others around me. I wheeled that contraption up the driveway and when I went over a bump there was quite a hollow metallic sound from the box - granted it is empty now but a lot of the noise came from the lid bouncing around. Then I remembered the name on its side.

A very fitting name though I don't think it is supposed to refer to the sound it makes when being moved on a bumpy surface. Most of the problem is the lid twisting and bouncing about along with the latch jumping up and down, it clatters quite a bit.

I decided that the easiest way to stop the bouncing was to add double-sided tape to the inside of the lid and the ridge of the box - it has a bit of a 'spring tension' and I ended up putting two layers on the inside of the lid closest to the latch.


That solved half of the problem. The other half is the fact that the box was resting metal-on-metal against the ladder and with movement and bouncing around it is bound to slide a bit and occasionally lift and hit back against the metal rungs of the ladder. I first looked around for something to wrap around the rungs, then tried tying rope around them keeping in mind that this needs to look presentable at a wedding as well - of course it is for 'field work' and can be hidden behind a tree most of the time but the better it looks the less pressure there is to hide it.
Then I looked across at my weights equipment and saw this padded platform that I took off a declined sit-up bench I bought for $20 a while ago. It looks pretty snazzy on there. This is the part where you start thinking "How heavy is this all going to be and how much of this is 'necessary'?". I weighed the board and it is 2.5 kg. With the leverage of the ladder and the weight the wheels are taking that probably amounts to another 1kg in my hand. That's less than the weight of a 70-200mm f2.8 lens and I don't own one - shooting dx means all my lenses are lighter then a full frame kit so I'll allow myself this extra 'luxury' for now. It made a huge difference on the noise levels and it keeps the box straight, while before it was twisting with the shape of the [slightly distorted] ladder making the lid a bit harder to close.
Another plus? In New Zealand there are a lot of park benches [plus rain] and many of them are often too wet or overgrown with fungus [sometimes bird poo] to ask a bride to comfortably sit there in her wedding dress - which means a few lost photo opportunities. This padded board, plus perhaps the little 6X4 tarp I keep in the box for emergencies, will make it possible to have the bride sitting anywhere from overgrown benches to slightly muddy fields.

After testing out various positions to have it without sliding out I decided to add a little right angle at the base of the ladder. Initially I was wary about having the box too close to the wheels - there will be more bouncing movement at the wheels and less nearer the handle. The padded board is now providing some suspension, along with the fact that my gear will also be in padded bags in the box, which allows me to feel ok about having the box and board as close to the wheels as possible.

I went out and bought some brand new bungy cords after taking this picture - so it will look prettier than this :) I will also have 4 bungy cords in the box in case they are needed for an emergency shelter with the tarpaulin - you never know in New Zealand when the weather might change suddenly and it is always comforting to have a back-up plan if things get nasty.
So now you will probably believe me when I say my backpack often ends up weighing 25 kg when I go hiking in the bush - but I'm prepared for anything and the extra stuff has come in useful on several occasions. As long as it all fits in the box and I can move around comfortably I'm happy. Speaking of hiking gear and backpacks the extra backpack cover I have also fits perfectly over the box which will aid in camouflage and give some peace of mind if the weather starts to look 'iffy'.

Of course very few of the projects I start stay as they are, there's always room for improvement and fine tuning especially after their first real field test but I think I've come pretty close this time to a functional product that may only need a little tweaking.
Hmmmm, after posting this link to facebook this appeared on my feed.....

February 2019, I’ve added a swivel mount grip for a boom arm/flash holder. The ‘boom arm’ is a modified 5 metre telescopic“decoy retriever” for duck hunting. It can extend to a reasonable distance with a Bowens mount handle and umbrella with a Nikon SB800 and wireless trigger attached but I wouldn’t trust it too much outdoors on a windy day. At least the ladder itself would provide a heavy anchor to strap a heavy duty light stand to on a windy day for straight up mounting.