Flash: HSS or “auto-fp” flash.
New Website
You don't have to take sides!

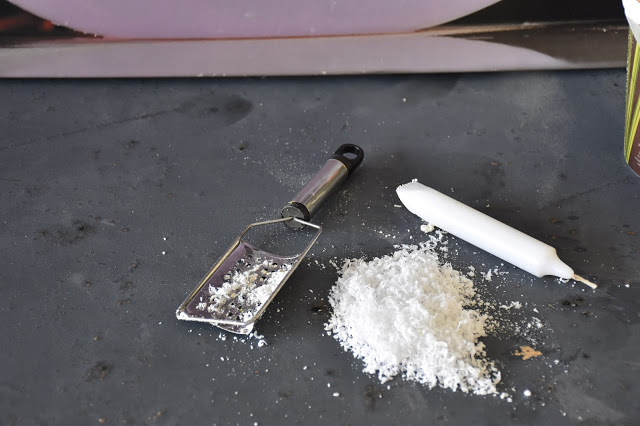
Safer smoke bombs

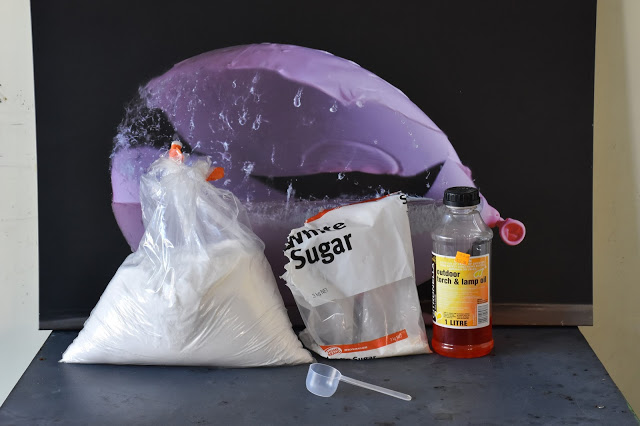
Mix 3 scoops of Potassium Nitrate, two scoops of sugar and a little more than one scoop of outdoor lamp fuel. More sugar will simply result in a bigger mess afterwards. The amount of oil isn't critical, just get the consistency that is good to work with.... basically that's it, you can light this mix and you will have a slow burning smoke bomb!

If you want to make it better you can add some wax. No cooking required still, you can simply get a cheese grater [maybe a potato peeler] and grate some wax into the mix which will slow it down further and give more smoke. Crayons can add colour as well if you wish.
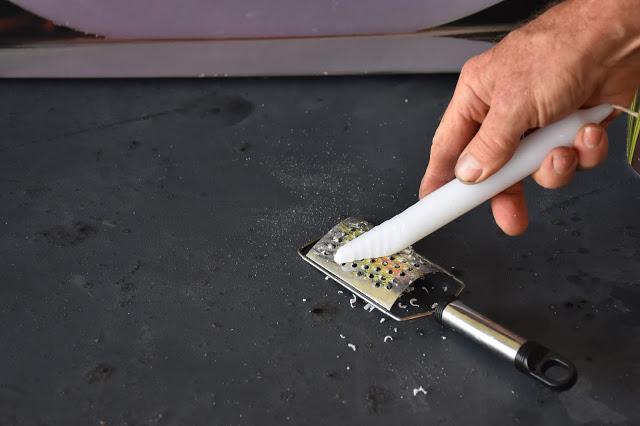
Throw this into the mix and stir well.
I had some nice size cardboard tubing, I have yet to try it with a toilet paper roll, I'm not sure if it will simply burn longer or the same amount of time with more smoke. Cut some slits at one end of the tube.

Fold the pieces in and tape it up.
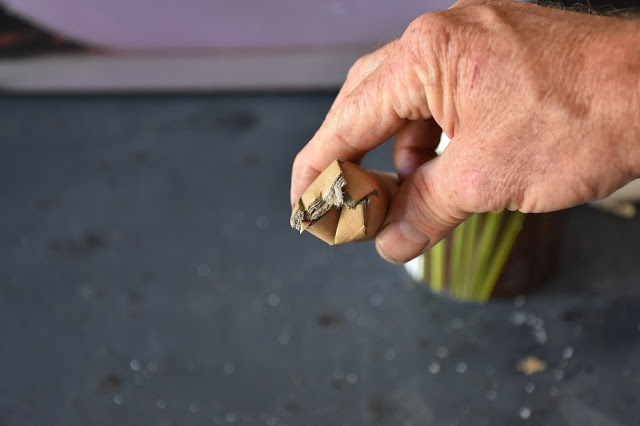
I'm a bit wary of the "grenade style" of smoke bombs just in case something gets caught on it and ignites it in my bag while I'm on my way to wherever I'm shooting. To make lighting it easier I simply pack the mix very tightly into the tube and push a match or two backwards into it, then all you have to do is strike the side of a matchbox on the match head to light it. This tube will burn for 3 minutes or longer.
I still need to try a few with a smaller opening to prevent it burning with a flame and make it burn longer.

This was a quick test burn of the mix, about a teaspoon of that mix burned for a minute.
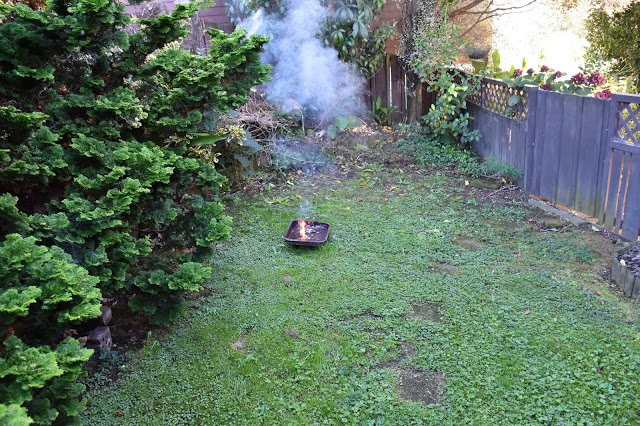
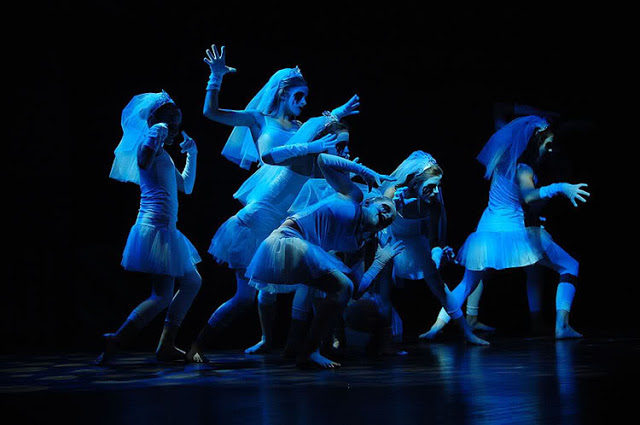
And a quick photo to show the effects that can be achieved with a little smoke in a photo.
This was from a previous shoot where I lit some cooked smoke bombs that burned out in 20 seconds and produced a lot of smoke.


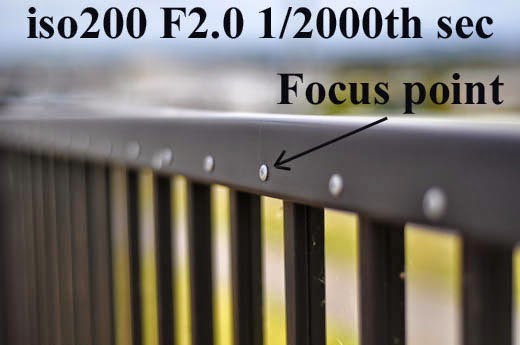
Are manufacturers overdoing high isos? How about a clean iso 768 000 000 before we're happy?
Many people have made comments in the past that nobody needs iso 1 000 000, and that "high iso's are getting ridiculous" in new cameras. I don't agree and feel that much of the opposition is due to fear of change. In 10 years when we have a clean iso 1 000 000 people who are born in that time would feel very limited by only having a camera with a clean iso 10 000.
Let's do some calculations, supposing that because many people like to shoot with their lens at its sharpest with a large depth of field around f11, and a safe setting for minimal movement is 1/1000th sec for most practical focal lengths we shoot with.
Let's go to an EV of -6. You're outdoors, nice clear night with lots of stars [in 20 years we will be discussing shooting landscapes on an overcast night and how far we can push the iso] and you want to shoot at f11 and 1/1000th sec, maybe catch a bat in flight by chance as well :)
EV-6 means f11, 128 minutes and iso 100, or 1 minute and iso 12800, 1 second and iso 768 000, 1000th sec and iso 768 000 000.
Manufacturers will continue to push the limits of high iso and one day, when we have a clean iso 768 000 000 who wouldn't embrace the prospect of going for a walk at night and snapping a few milky way photos without having to carry a tripod around. :)
At one dance event I shot with with my D40 at f2.8 1/125th sec and iso 800, 10 years ago.
Now if we had a clean iso 1 000 000 that could have been shot at f11 and 1/1000th sec.
Of course many will oppose that idea, some will even argue that they like having the blurred background that f2.8 yields - well they can still have that if they want while others can embrace the prospect of a large stage performance and being able to get everything in focus at f11 and 1/1000th sec when they want to. That's the beauty of it, you don't have to use it if you don't want to - just don't whine about it not being necessary because there are many of us would love to have a clean iso 1 000 000 - while we wait for the clean iso 768 000 000.
The Mantis story
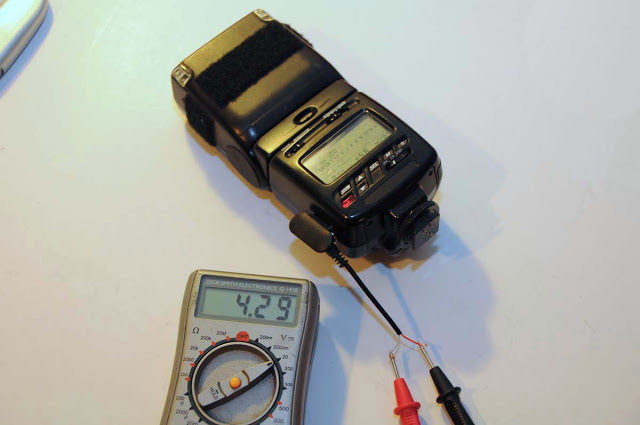
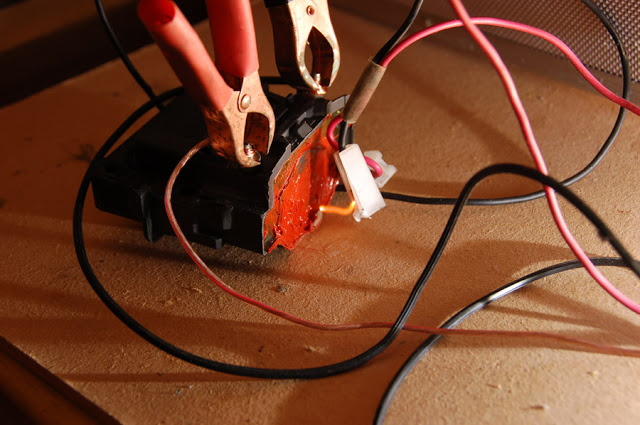
The $4 sound activated flash trigger.
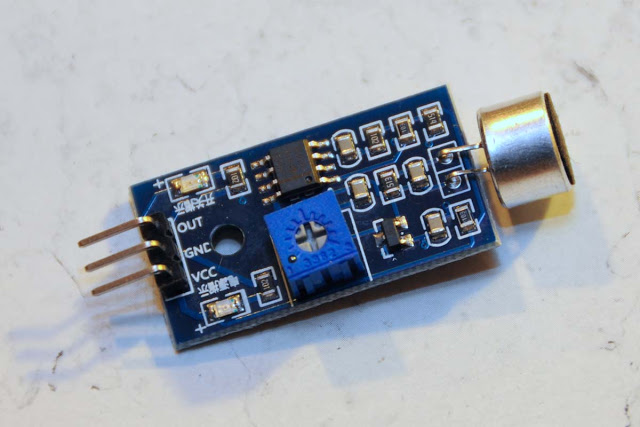
I used a 3 way battery holder which provides 4,5 volts when 3 AA batteries are fitted. I used a fairly short pc cable and would advise making it much longer for a practical sound switch so you can move the flash around easily.
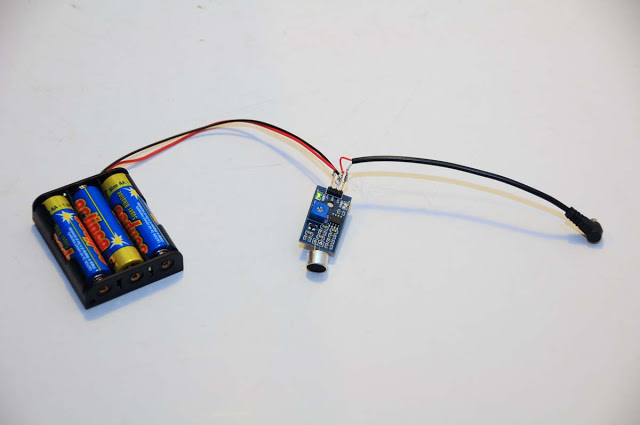

One work-around is to set the sensitivity very low so it needs a rather loud noise to trigger - that reduces the risk of multiple flashes during the exposure.
I have tested this using my Nikon SB26, Nikon SB800 and a Yongnuo 460 with no problems.
For only $4 worth of components what have you got to lose? :)
This is my ebook on the subject of high speed photography if anyone is interested.
Understanding Explosure
http://www.amazon.com/Understanding-Explosure-Desmond-Downs-ebook/dp/B00C5TP504
The rants of the future. Stills from videos.
Seriously, if you're unhappy with the fact that it is getting harder to earn a living doing something that you enjoy - welcome to reality and change your job or stop whining about it because it's just becoming irritating. We would all like to earn a living doing what we enjoy but the customers are the ones who dictate how the market swings. If you refuse to hand over the digital images to a client then there are 10 people waiting to take the job and do so instead while you argue ethics all the way to the poorhouse.
Now a prediction for the future. 4K video will mean less work/jobs for photographers, particularly wedding photographers. The customers will find out "Hey, there's this guy who can video the whole wedding and then pull still images from the video - so we don't need a photographer!" The next step will be "Well I found a guy who is prepared to hand over the entire video for us to extract the photos ourselves!" [Which they will never get around to doing but the money would have changed hands by then].
Of course the working photographers will all argue "That's 'only' 8 megapixels, we will be shooting with 36 and 50 megapixels that will blow the customers away with their quality!". Sure, that's true but what decides who a customer chooses for their wedding? maybe 1% of the weddings involve "we are prepared to pay for the best on our special day and can afford it" while the other 99% involve "We have $$$ for the food, $$$ for the venue, $$$ for clothing, $$$ for cake, $$$ for the DJ which leaves us with ?$? for photos. [photos are always at the end of their list because what good are top quality photos of hungry guests with empty plates?]
Now of course all the photographers are thinking that of course stills taken from a video will never match a well planned photo with a decent camera. BUT: The average person is so amazed by the amazing pictures they are getting from their phones and have become used to that quality, that a quick thinking videographer only has to present one or two well chosen photos printed from stills taken from a 4K video which will make the customer wonder why they would ever need a photographer when they can get video and photos from one person for half the price.
So here is my prediction: Before the end of 2015 we will be seeing the start of the blogs ranting about how we should "stand together united as one to educate the public as to why they need a good photographer at their wedding as well, rather than relying on 'inferior' images taken from a 4K video".
Good luck pushing that water uphill with a rake - the masses have already shown us what kind of quality they will accept and when they have to choose between $4000 for a videographer and photographer compared to $2000 for a videographer that can pull stills of their choosing from the video we know which direction they will go. Then there will be the 'weekend warriors' prepared to do it for $500 of course.
Now for those of you who are saying that 8 megapixels isn't enough for top quality images please do this test. Take a photo with your 12/24/36 megapixel camera and save a copy of it while you resize that image to 1154 X 1732 = 2 megapixels as well. Print them both out at 8 X 12 inches [A4] and compare them. You will find that you can get a decent enough print from 2 megapixels so surely 8 is enough for most clients who can't afford to hire a photographer and videographer? Of course the purists will argue about the merits of the latest 50 megapixel camera [which they will be saying is not enough when 120 meg cameras come out] but the average person will be blown away by a good 8 meg image at billboard size because it's more about viewing distance than using a magifying glass - to 'normal' people that is.
So prepare to adapt to the changes that are taking place, maybe learn to do video - or start fighting for the scraps, the people who only want photos. Otherwise pick up a rake and start sweeiping that water uphill while you try to educate the public as to why they should resist progress.
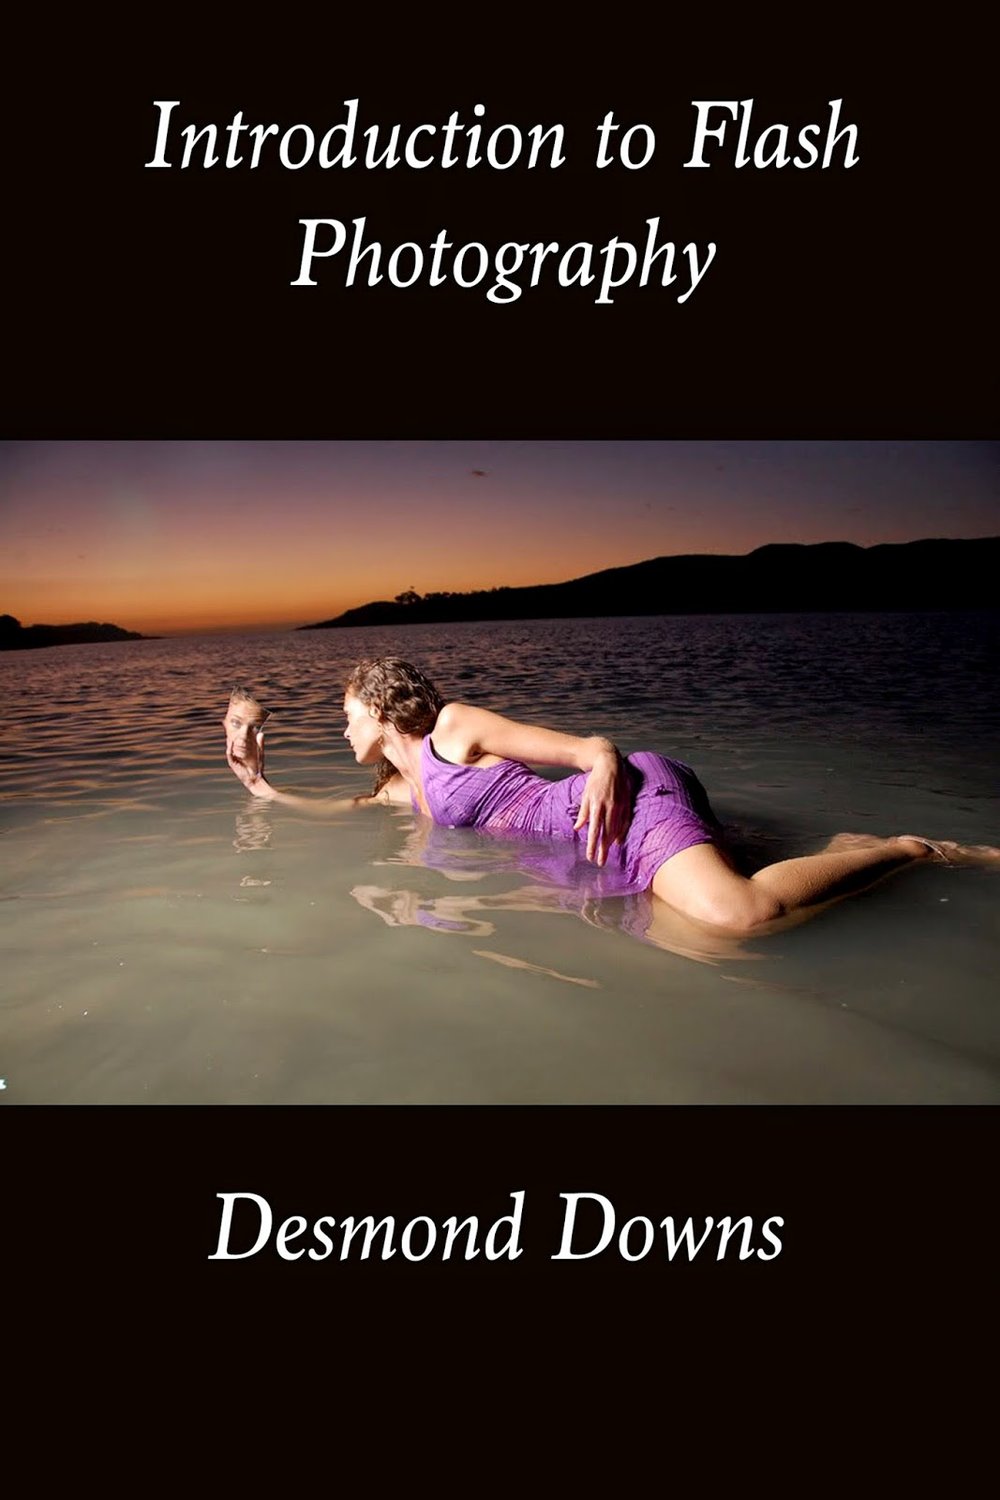
My new ebook "Introduction to flash photography"


Valuebasket Buyer Beware! They are not local even if their site suggests so.
I decided to let others know of my experience with the company. The site I visited I thought was local www.valuebasket.co.nz . A friend had bought two lenses from them over a few months with no issues except perhaps delivery taking a bit longer than expected.
I decided to take the plunge and bought two lenses for my Nikon at good prices - that's where I stop using the word "good".
After two weeks I got impatient and told them I was tired of waiting and wanted my lenses as soon as possible. A few days later I got a letter from New Zealand customs stating that some items I ordered were being held because they had false declarations on them and were listed as "samples".
I contacted valuebasket who kept reassuring me with suggary words that everything would be sorted out and thanking me for my patience and co-operation.
Eventually to cut a long story short they advised me that New Zealand customs would not allow them to make the payment of $137 required to clear the items and that I would have to pay it and then I would be "promptly refunded"
Of course I had serious doubts about that but knew I would not see the lenses otherwise.
Since then I have been contacting them and supplying invoices from customs, a receipt for my payment and asking when I get my refund.
The latest email confirmed that I will never see my money:
"I have just received an update from our relevant department, and they are asking if you could like provide a 2 separate invoices for the 2 lenses so we can refund each customs fees separately."
Two separate invoices for them to pay me the one amount I paid for both lenses? I know how this is going to end, they will insist that is the only way they can refund me, for some unknown and unexplained reason, and even if I do get two separate invoices they will find another way to frustrate my attempts knowing that eventually I will tire of asking and give up on them.
Of course if they do finally refund me I will change the ending of this blog but until then "Buyer Beware" Valuebasket will take your money and once they have it they will leave it up to luck as to whether you ever see the item or not and will not honour their listed price if other unplanned costs come up. Here are some of their flowery responses to my complaints:
"Thank you for your patience whilst awaiting the arrival of your goods.
Keywords: scam, value, basket, valuebasket, buyer, beware, ripped off, fake, www.valuebasket.co.nz.


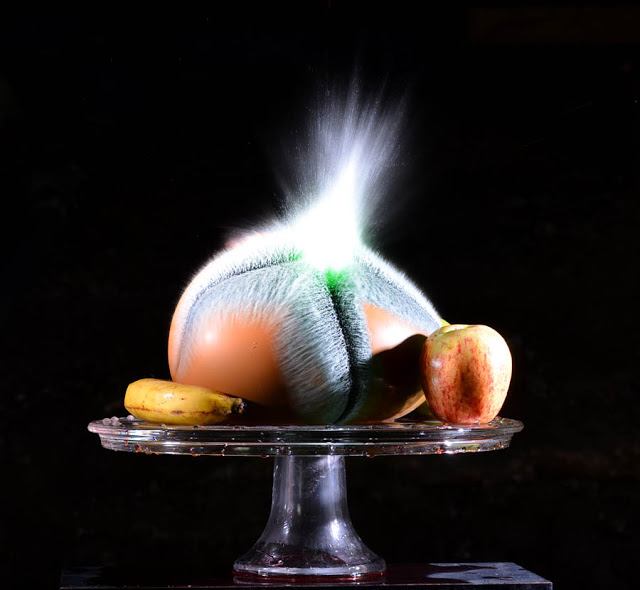
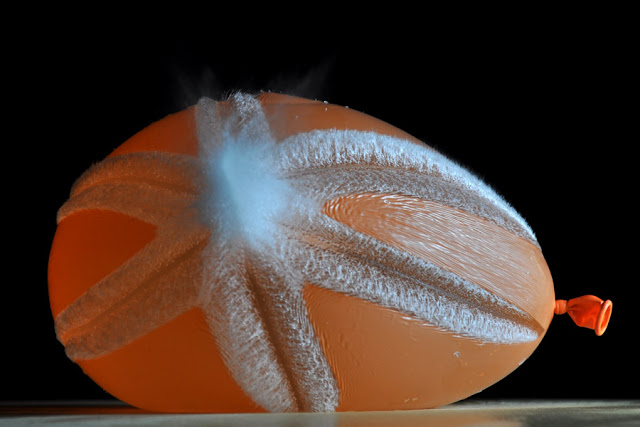
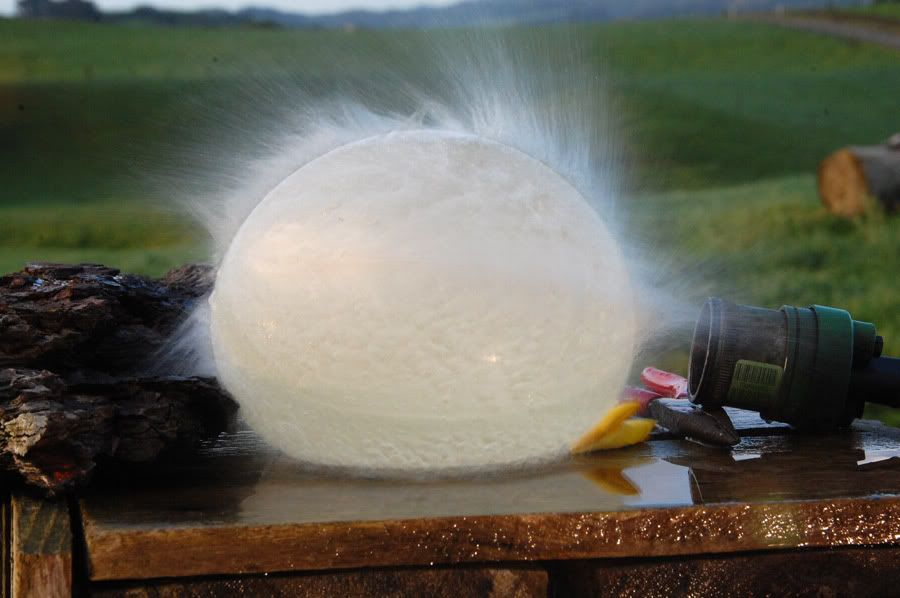
The next shot was also a bit high but the microphone was a bit further away so the balloon was totally gone when the flash fired.
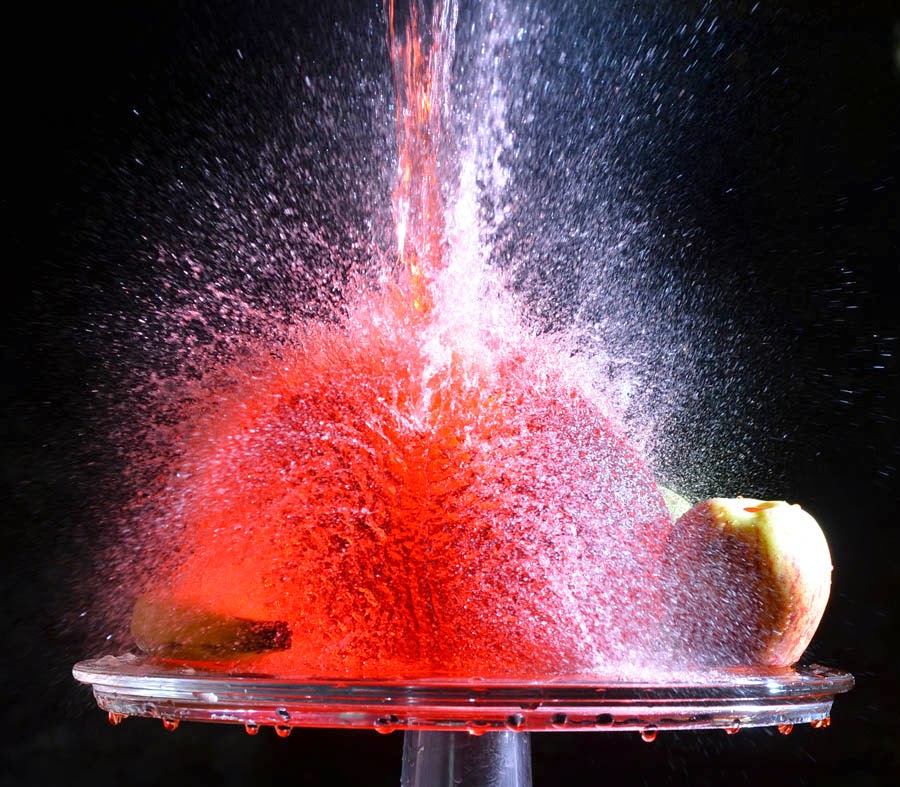
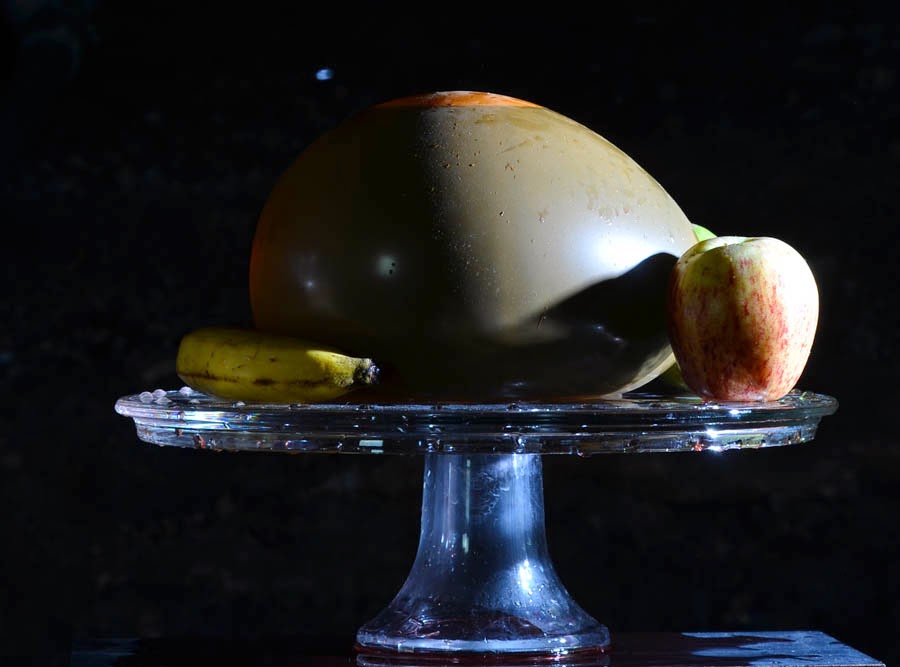


I do need to remember to take a little more time to clean up between shots, and also get better looking fruit because that banana was very soggy and a bit green inside after getting blown off the stand each time by a water balloon bursting.

So, mental note to myself for next shoot: There is no point in spending two hours setting things up only to get 80% of the results I wanted when another 30 seconds of cleaning could make 20% difference to the shot.

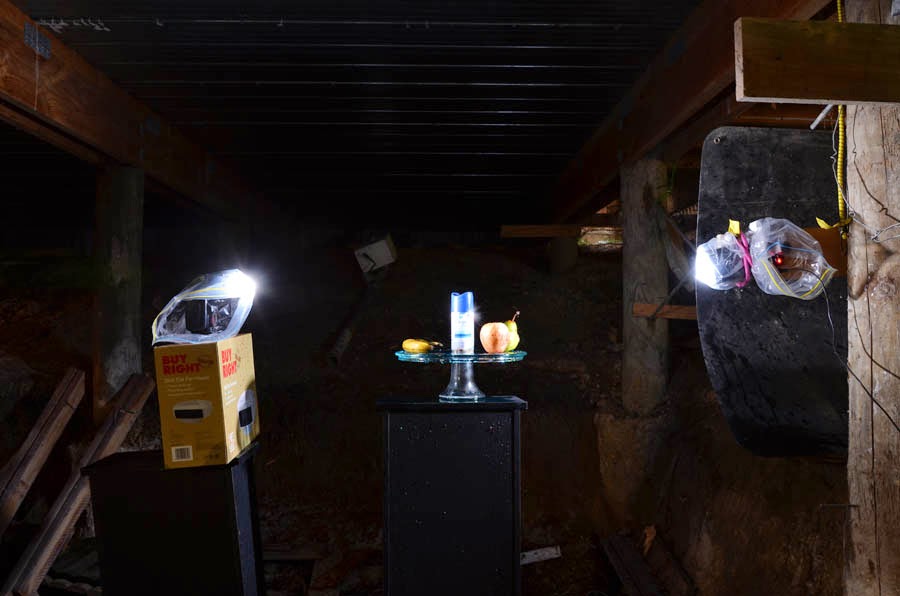
Well the batcave is all set up now and I've ordered another 100 balloons so it's time to see what I can do with water balloons and perhaps throw in a bit of superspeed photography so see what I can accomplish :)
A few from Sunday afternoon, the next day.


Some of my work on National Geographic blog.
Flash: Nikon TTL-BL as reliable as your matrix metering.
A misleading statement 30 000 image database.
Here is their statement
" Matrix Meter is called the 3D RGB Color Matrix Meter.
This meter gathers information from 1005 red, green, and blue sensors and factors in distance information provided by the lens as it evaluates proper exposure calculation. This meter instantly analyzes a scene’s overall brightness, contrast, and other lighting characteristics, comparing what is sees against an onboard database of over 30,000 images for unsurpassed exposure accuracy, even in the most challenging photographic situations. By the time the 3D Matrix meter has made its considerations of colors by hue and saturation, tonal ranges by brightest and darkest, areas of similar tonality that are connected or separated, distance to the subject, and compared that to its database generated from photographic images, it’s got a very good idea of what the exposure should be.
If you are a beginner, Matrix is where you should start. As your skills grow, and they will, you will acquire a better understand of when it might be beneficial to use other light metering options.
What is the database of over 30,000 images?
Over the years Nikon has studied the color, area of coverage, focus distance, contrast, size and shape of shadows and highlights and exposure characteristics of over 30,000 actual photographic images and incorporated this data as a reference source for the expert exposure system that is the 3D Color Matrix Meter."
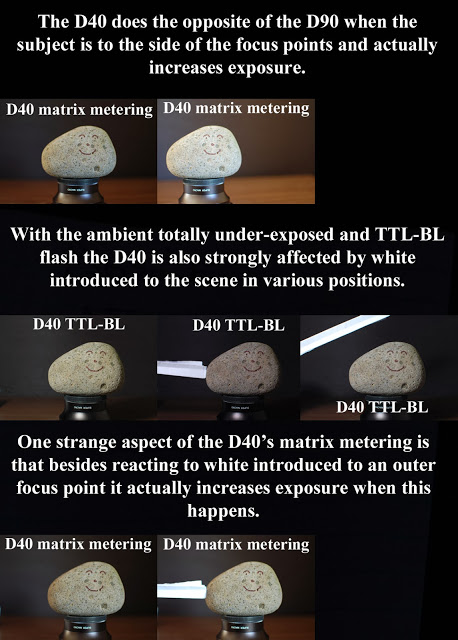
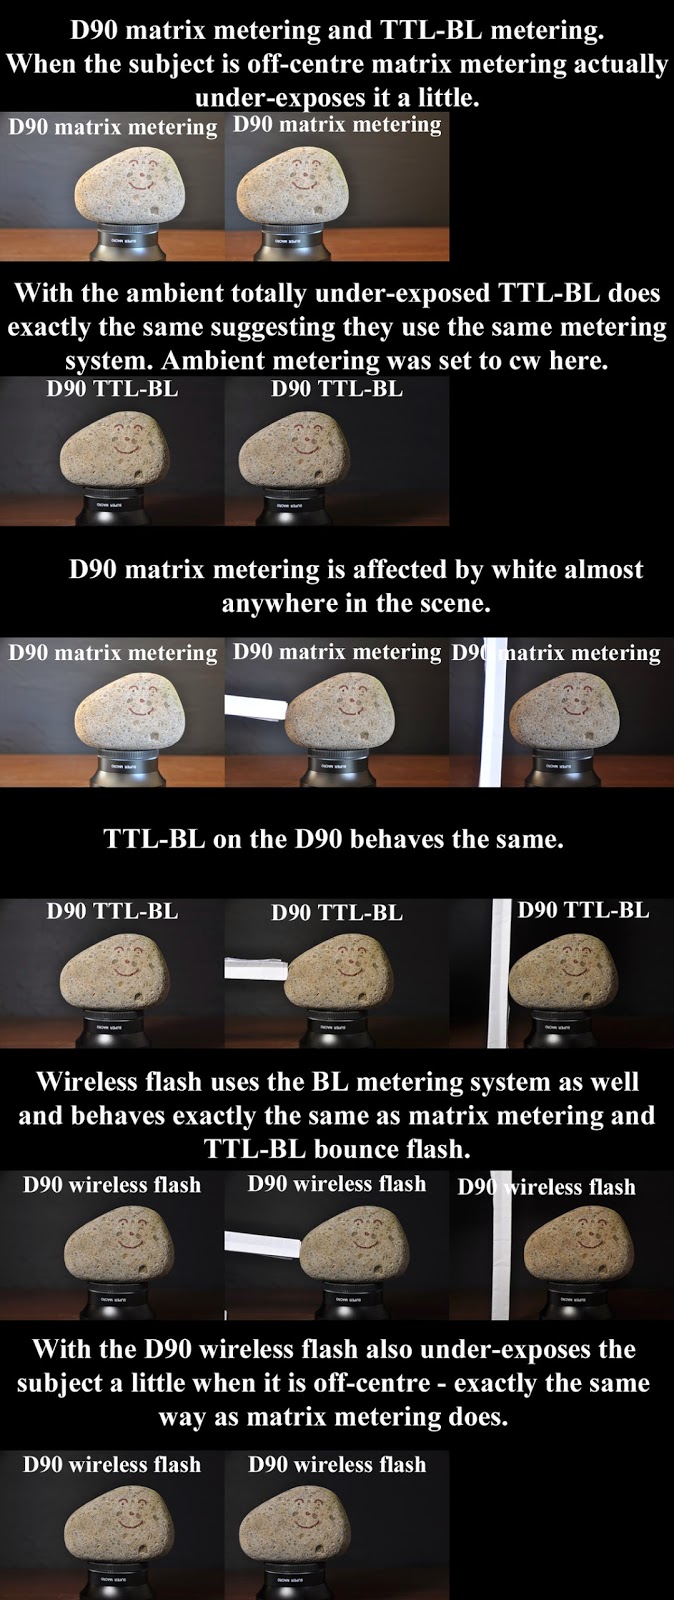
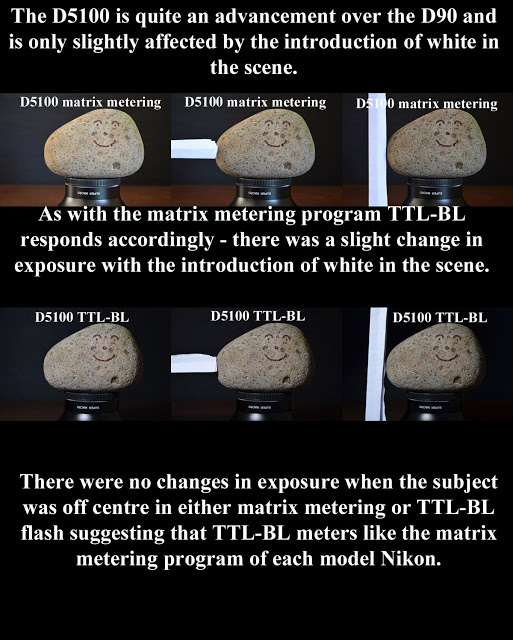
I find this statement particularly unbelievable considering the difference we see in matrix metering in different bodies . My D40 meters very strongly for the focus point selected , the D90 is more accurate and I shoot in matrix metering with both of them .
Think about it, when a D4 is shooting at 10 frames per second is it really likely that in less than a tenth of a second the camera's processor can do all its calculations including flipping through 30 000 images before taking each picture ? Close to impossible I say !
It is more likely that Nikon have studied 30 000 images and written an algorithm based on that research to program matrix metering . There are many other factors involved in calculating exposure and each body is slightly different with different parameters programmed into it otherwise a D40 would give the same exposure as a D4 with the same scene - but this does not happen .
So my next lot of studies will involve analyzing matrix metering to see if I can work out the metering parameters of the D90 - I'm sure it will be similar to many other models out there and the more I understand a program the more benefit I can get from shooting in that mode by being able to 'predict' its reaction to different scenes at different distances.
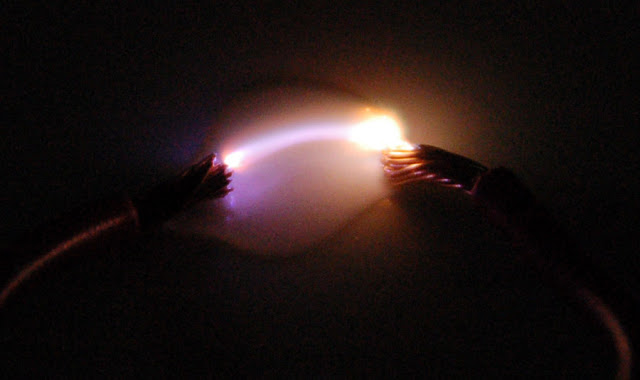
"Superspeed" photography .
Most high-speed photography is done in the dark with a slow shutter speed and the motion being captured by a flash on low power , usually resulting in a captured speed of around 1/10000th of a second . See my post on
.
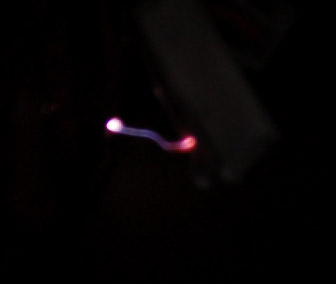
Tonight I managed to wire up my camera to trigger an event when the shutter opens and at very high speed .
I see many possibilities for this especially since I will no longer need to wait for darkness to do high speed photography .
I call this "superspeed" photography and am not sure if it has ever been done before .
I suppose time will tell if I get good results from this but so far this is what I've accomplished :
Doesn't look like much does it ? But that spark was triggered by the shutter of my camera opening at 1/200th second .
I did a few more tests and managed to take it all the way to 1/4000th sec and still capture the spark - triggered by my camera's shutter opening .
1/4000th second :
<br />
I can see all sorts of possibilities for high speed photography in broad daylight
Stay tuned !
20/01/2011 , I tried a few pictures outside in the evening ....
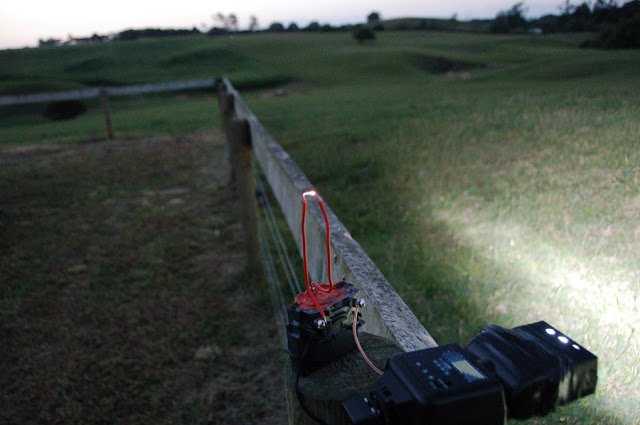
Then I went indoors to try and find something that would react nicely to a 20000 volt spark . A water drop didn't do much .
Some brown sugar looked slightly better .

Then one of the flies that had been annoying me all afternoon wandered between the wires - I couldn't help smiling as I initiated and photographed the last millisecond of the fly's life :)
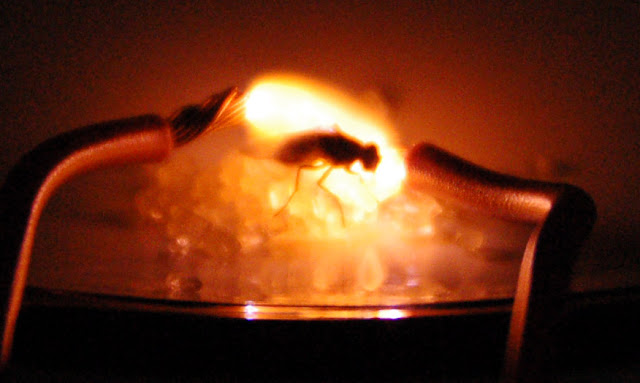
I will try to find something that reacts nicely to a spark going through it , or perhaps use my 'monster flash' modification with its giant capacitor attached to generate some 'real' energy .
29/01/2011 .
Today I added a high performance coil to my hammerhead flash and am getting about 50 000 volts out of it .


72km in 16 1/2 hours
Search Posts
Featured Posts