Do you need a new camera?
"Should I upgrade my existing camera body?", "What should I buy next?". These are questions commonly read on the forums and facebook groups. The short answer is that if you need to ask then you probably don't need to upgrade because if you did need to upgrade you would already know why and wouldn't have to ask.
Often the first factor that is quoted is megapixels which reminds me of a camera store I was in 10 years ago. I was browsing the cameras on display when I heard the clerk telling a customer "Your camera is only 5 megapixels, that's only good for printing 6X4's but if you want to print bigger you need to upgrade to this new 8 megapixel version." This was not too long after the days when they were printing billboards taken from 3 megapixel images.
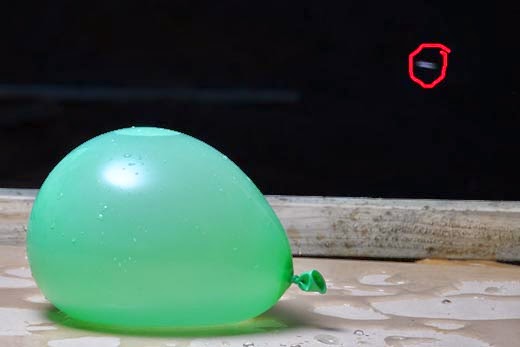
This was taken recently with my 6 meg Nikon D50.

About a year later I heard a clerk in the same store telling a customer "Your camera is only 8 megapixels, that's only good for printing 6X4's but if you want to print bigger you need to upgrade to this new 12 megapixel version." believe it or not I'm still reading comments like that about people "needing" to upgrade from 12 megapixel bodies to 24 megapixel versions.
Are you amazed by some of the images you see from 36 megapixel cameras? Well you're probably viewing them on a screen that is less than 6 megapixels which tells you that the same image could be done with a 6 megapixel camera and it would still amaze you - it's not the camera that is amazing, it is the photographer's skills you are seeing.
Actually sometimes it's just blind luck like this picture I got early one morning while touring New Zealand :) Nikon D40, 18-200mm VR lens.

I'm actually so tired of reading these discussions about why people who don't even know how to use their 12 megapixel camera should 'upgrade' to a 24 megapixel camera that I'm inclined to post more images taken from my 6 megapixel cameras "just because".
Granted, if you are a professional doing a shoot for an advert and know exactly what you want from it then by all means choose a good camera body and lens combination [most likely a prime lens] and do your the job that you know is earning you a living. But if you are still learning then please consider simply learning to use what you have before throwing more money at gear.
My person preference is..... whatever lens is on the body. If I want wide angle I'll grab my D90 with the 12-24mm lens on it. If I want versatility I'll grab the D40 with the 18-200mm lens - I don't care much how many megapixels the body is because I know that 6 meg is enough for a full page picture in a magazine - why do I need more than that?
Of course many will say "You can crop more with more megapixels" [possibly the same people who used to scoff at "digital zoom" on a camera]
I also love the versatility of a "low quality" super-zoom that can get me from 18mm to 200mm for vastly different images in the same scene.


At the last wedding I shot I had my 16 meg D5100 but since I already had the 18-70mm lens on my 10 year old D50 I grabbed it for a shot similar to the one above. You can make a large canvas print from a 6 meg image so it was more than enough for my needs.
 I was once driving home and saw this sunset developing in the distance. I 'only' had my D40 and 18-200mm lens on the seat next to me and raced down to the beach. It would have been nice if I could have gone wider but 18mm did an ok job this time.
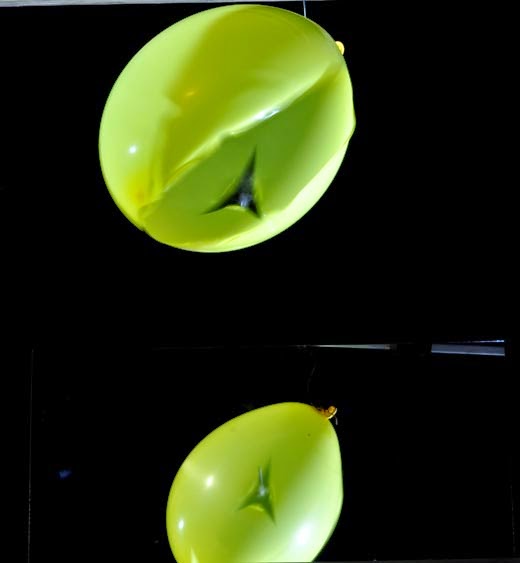
 Then there was the shot from the comparison at the top of this page. The lighting was just right and since I was doing a tour I had my 18-200mm on the D40 once again.
 So please think carefully before making your next purchase. For my particular style of shooting the only thing that entices me to upgrade is better low light image quality - clean high iso. With today's technology they could probably make a really good low light 6 meg dx body but instead they are forcing 24 megapixels onto the sensors and trying to get the most out of them. Just think, back to 6 meg and they could do 4x better in low light but infortunately the masses see megapixels as what makes a good camera to buy and nobdy will step back to 'only' 6 meg [besides me] if they make such a camera.
My advice is this: If your camera is really old then wait till the next new release and buy a second-hand body from "last year" for $200 as the masses rush to buy the latest and greatest. If after a year you decide you would still like that body that was new back then you will probably be able to buy it for $200 less than when it was released and you will now have a spare body, plus that camera - for the same price as what it would have cost when they were just released. You will probably also find that your pictures are no different except perhaps in low light.
Often the first factor that is quoted is megapixels which reminds me of a camera store I was in 10 years ago. I was browsing the cameras on display when I heard the clerk telling a customer "Your camera is only 5 megapixels, that's only good for printing 6X4's but if you want to print bigger you need to upgrade to this new 8 megapixel version." This was not too long after the days when they were printing billboards taken from 3 megapixel images.
This was taken recently with my 6 meg Nikon D50.
About a year later I heard a clerk in the same store telling a customer "Your camera is only 8 megapixels, that's only good for printing 6X4's but if you want to print bigger you need to upgrade to this new 12 megapixel version." believe it or not I'm still reading comments like that about people "needing" to upgrade from 12 megapixel bodies to 24 megapixel versions.
Are you amazed by some of the images you see from 36 megapixel cameras? Well you're probably viewing them on a screen that is less than 6 megapixels which tells you that the same image could be done with a 6 megapixel camera and it would still amaze you - it's not the camera that is amazing, it is the photographer's skills you are seeing.
Actually sometimes it's just blind luck like this picture I got early one morning while touring New Zealand :) Nikon D40, 18-200mm VR lens.
I'm actually so tired of reading these discussions about why people who don't even know how to use their 12 megapixel camera should 'upgrade' to a 24 megapixel camera that I'm inclined to post more images taken from my 6 megapixel cameras "just because".
Granted, if you are a professional doing a shoot for an advert and know exactly what you want from it then by all means choose a good camera body and lens combination [most likely a prime lens] and do your the job that you know is earning you a living. But if you are still learning then please consider simply learning to use what you have before throwing more money at gear.
My person preference is..... whatever lens is on the body. If I want wide angle I'll grab my D90 with the 12-24mm lens on it. If I want versatility I'll grab the D40 with the 18-200mm lens - I don't care much how many megapixels the body is because I know that 6 meg is enough for a full page picture in a magazine - why do I need more than that?
Of course many will say "You can crop more with more megapixels" [possibly the same people who used to scoff at "digital zoom" on a camera]
I also love the versatility of a "low quality" super-zoom that can get me from 18mm to 200mm for vastly different images in the same scene.
Quite often when I had just bought a 70-200mm F2.8 VR lens I would go for a walk to find something to photograph with this high quality lens only to find that I couldn't zoom back far enough when I needed to. There's no point in obsessing about image quality when you don't have a useful focal length to get the images you want. And if you don't know what you are going to need when you go for a walk then it's best to be prepared. Rather get the shot you want at 90% quality than miss the shot at 99.9% quality.
It's not fancy gear that gets you good shots, unless you are shooting sports or something that needs really fast auto-focus - it's knowledge and sometimes just the luck of being in the right place at the right time - with the right focal length lens at your disposal. That is less likely to happen if you have a prime lens on your camera.
Many of my favourite shots were taken with my 6 meg bodies simply because they had the lens I wanted on them at the time.
This shoot for example involved being in the harbour and the risk of getting everthing wet. I chose the 6 meg D40 and 18-200mm lens rather than my new D90 at the time. This is the shot I was aiming for - at about 200mm.
Then I decided to go wide so I could show people the setting, and zoomed back to 18mm [couldn't do that with a 200mm F2.0 lens :) ] and got this shot. I love the versatility of a super-zoom and realistically for my uses [having fun] I doubt I would see any difference with prime lenses that would simply limit my creativity.
My advice is this: If your camera is really old then wait till the next new release and buy a second-hand body from "last year" for $200 as the masses rush to buy the latest and greatest. If after a year you decide you would still like that body that was new back then you will probably be able to buy it for $200 less than when it was released and you will now have a spare body, plus that camera - for the same price as what it would have cost when they were just released. You will probably also find that your pictures are no different except perhaps in low light.
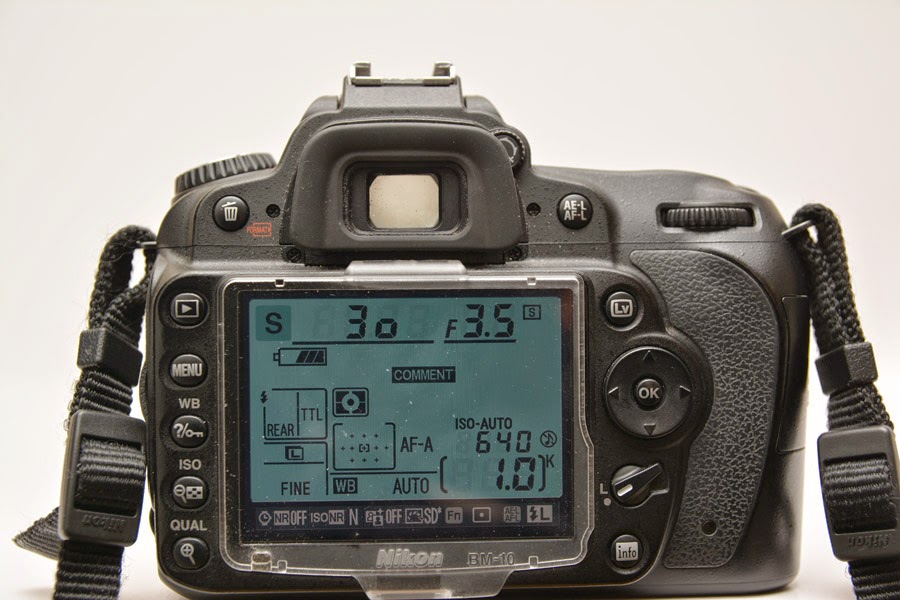
Camera settings for beginners.
The settings I am about to describe are what I call "safe mode". If I were to hand my camera to someone and ask them to take some photos for me or simply grab the camera myself to get some quick photos these are the settings I would have my camera on.
For those of you who know what you are doing and what settings you want to use this blog is not for you - it's to help beginners find a safe selection of settings to use before venturing out on an unplanned shoot where they don't really know what they will be photographing and are not entirely sure what settings to use. It's also the settings that my cameras are always at unless I have it on a tripod in manual mode preparing for some 'experiments'.
The photos here are of my D90, taken with my D5200. I don't care which of the two I grab to take pictures with, it depends which lens I am after. The D90 usually has the 18-200mm on it and it's the one I grab for most walkabout shoots. The megapixels mean nothing to me, if I need the 35mm f1.8 lens I grab my 6 meg D40 because I have never needed more than 6 megapixels.
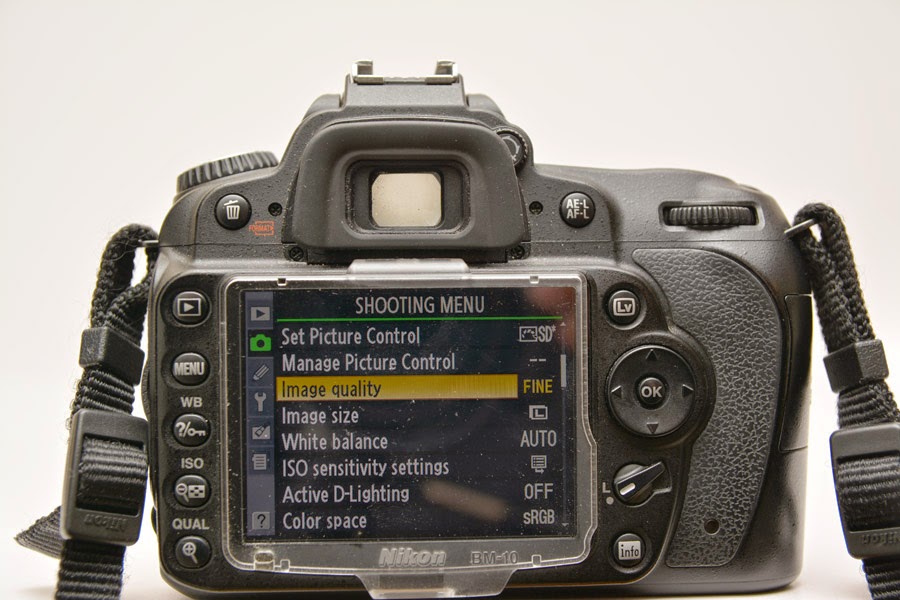
First I will mention the basic setting my camera is on for image quality. I only shoot in jpeg mode. If you want to shoot RAW then I advise setting your camera to RAW+jpeg and comparing the two files after editing them and see if you need to shoot RAW. RAW is superior in every way except the amount of memory space it wastes and the fact that you have to edit it before sharing. Having said that I shoot in jpeg mode to discipline myself to get as many settings as possible right in-camera when shooting. if I did photography for a living I would shoot RAW.
I set my image quality to "large" and "fine". If you print out two photos, one taken in "fine" and one in "basic" they will look exactly the same - unless you edit them, and almost every photo needs a fine tweak of some sort no matter how well you have your exposure set - there are too many variables to get it right in-camera every time besides the limitations of the sensor itself.
A jpeg fine is like a thick slice of bread, it looks exactly the same as the thin slice [basic] from the top but if you put them both in the toaster [Photoshop] the thin slice will 'warp' while the thicker slice will handle it better. This means that jpeg fine has more information to 'throw away' to achieve the desired result when you edit. RAW is like a quarter loaf of bread in comparison, you can choose where you cut it before putting it in the toaster - within reason of course. :)
I leave my wb on auto as well. Auto settings are by no means perfect but they generally get the images close enough to be able to save them through editing later. If you set white balance manually you need to be fast enough to change it with changing light and have the memory [in your head] to do so. I don't have a good memory so I let the auto modes do some of the thinking for me.
I also have my iso set on auto. I set the actual iso manually to the lowest - iso 200 in this case because "lo-1" is a trick mode that loses quality. I have it set to be able to choose the maximum iso necessary to allow me to use my other settings with a minimum speed of 1/125th. That way it will keep increasing iso to prevent my shutter speed dropping below 1/125th because "you can fix noise but you can't fix motion blur!". What's the point of staying at iso settings for the best image quality if your shutter speed is so slow that the subject is a blur? In any case it's perfectly fine to have some noisy images in a set, many non-photographers will think it's artistic :)

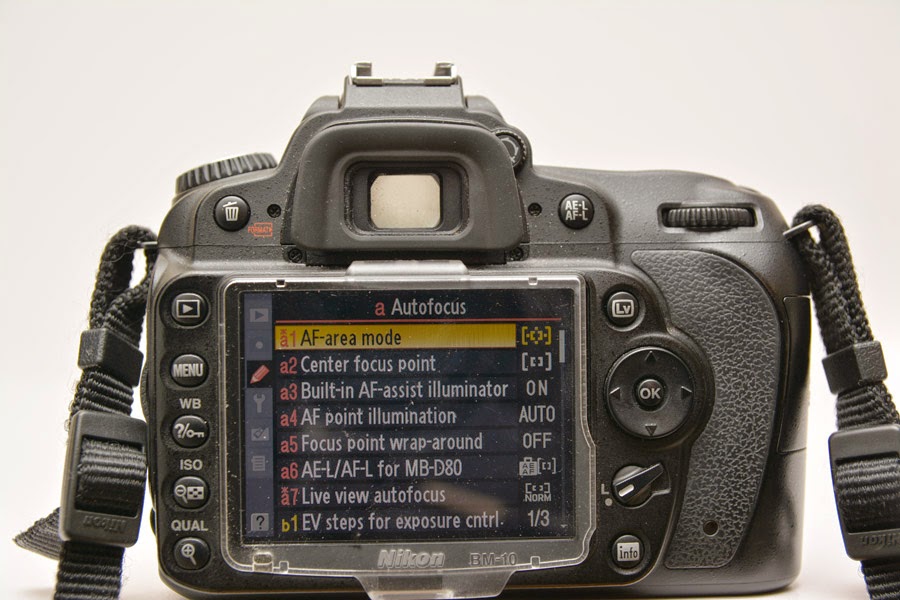
I have my AF area mode set to 'dynamic' so it uses all the focus points for its calculations but I choose the main one myself. This prevents the frustration of it choosing a subject that is closer if it is in fully auto mode. I set the centre focus point to "narrow" because I find that when I have it at "wide" it doesn't focus as well, usually on something behind my subject.
 Now most of the time when I am doing 'walkabout' shooting I am in program mode. Shocking isn't it? Not really because I know how it thinks and I have the camera set up to take advantage of this. When you are in program mode the camera will remember what the minimum shutter speed is that you have told auto iso to allow. If the subject is a little dark the camera will do everything it can to prevent increasing the iso, which is good for image quality.
First it will open the aperture to its widest, then it will lower the shutter speed, but not below that 1/125th sec that was set for auto-iso. Once it hits 1/125th sec it now only has one setting left, iso. It will then increase iso to the point where it reaches what it deems to be 'correct' exposure [I have a long chapter on this in my ebook]. So you may end up at let's say f3,5, 1/125th sec and iso 800 - but you couldn't go wider on the aperture, you don't really want to be shooting slower than 1/125th for motion blur so all that is left to save the shot is an increase in iso - or you can't get the shot. If it gets to its maximum iso [iso 3200 for my D90] it will do the only thing it has left to do and use a slower shutter speed which may or may not get you the image you wanted but there isn't much else you can do in a hurry.
Then I put my camera in shutter priority where you tell it what speed to use.
 I set this to 1/30th sec. and that's not just some random number, it's for a reason.
 During normal shooting in program mode we are trying to avoid motion blur but every now and then a situation presents itself where the motion blur can actually add to the image. For me it's normally around 1/30th sec where the VR on the lens can save me from movement just enough to have a sharp background with a blurred subject - that's when I know that at the flick of the dial over to "S" I know that the camera has memorized the last setting I put it at, 1/30th, to give me the image I want without missing the moment. I was taking pictures of something from the top of my photovan and saw this truck coming past. Knowing that I had shutter priority set to 1/30th and wanting to make the speed look a little more dramatic it simply involved moving the dial to "S" and I got my shot. Then straight back to "P" again to continue shooting.

It's not about letting the camera do the thinking for you, it's about learning 'how' your camera thinks and using it to your advantage when time is limited. When you know why you choose these settings you are generally competent enough to shoot the same way in manual mode when time permits.
What about Aperure priority? I very seldom use it actually. perhaps indoors but most of the time I know that Program mode is going to choose settings very close to what I would choose while taking snapshots. If I'm indoors perhaps I may select the widest aperture my camera can go to but then again I know Program mode will do that anyway.


When I go to manual mode the settings for Aperture priority and Shutter priority are there as a base point to work from before turning off auto-iso if I have the time.
But there is another trick to turning off auto-iso [kinda] without digging into the menus - so you know it is ready to work for you again at the flick of a dial. Switch to Shutter priority and dial the speed slower than 1/125th sec.
If you have your camera on a tripod perhaps and you want to get some motion blur on the sea with a nice sunset you don't want auto-iso taking your speed up to 1/125th again. By having the camera in shutter priority you are telling the camera what speed to use regardless of what you have told auto-iso to do. But auto-iso will still work to get what the camera deems to be correct exposure.
As you dial the shutter speed slower the iso will drop back to 'base iso' [200 for the D90] and once it reaches this and you keep going slower it will start closing down the aperture to get the correct exposure. So basically you can set your camera to take a 1 second exposure at f11 and iso 200 even if auto-iso is turned on - without going into the menus. As soon as you flip back to Aperture priority or Program mode auto-iso will work exactly as before. :)
There is one other mode I use occasionally. Sports mode is handy when something happens in a hurry and you don't have time to change many settings. If I suddenly need to shoot something fast moving I simply flip to sports mode, there's no shame in using an auto mode if you actually know what settings it will choose and why - because it means you could choose the right settings if you had the time.
 All of the advice I give here is just a guideline for people who just want to go out and shoot for fun and learn with time. I would suggest using these settings when you want to be in 'safe mode' and when you have the luxury of time to experiment then try manual mode. For me I know that when my wife wants to grab one of my cameras and take some photos they are set up to pretty much get the pictures as close to the settings that I would choose anyway - then she will enjoy it rather than being frustrated by the camera and give up on it.
And just keep in mind that a jpeg could easily be published in a magazine :)
For those of you who know what you are doing and what settings you want to use this blog is not for you - it's to help beginners find a safe selection of settings to use before venturing out on an unplanned shoot where they don't really know what they will be photographing and are not entirely sure what settings to use. It's also the settings that my cameras are always at unless I have it on a tripod in manual mode preparing for some 'experiments'.
The photos here are of my D90, taken with my D5200. I don't care which of the two I grab to take pictures with, it depends which lens I am after. The D90 usually has the 18-200mm on it and it's the one I grab for most walkabout shoots. The megapixels mean nothing to me, if I need the 35mm f1.8 lens I grab my 6 meg D40 because I have never needed more than 6 megapixels.
First I will mention the basic setting my camera is on for image quality. I only shoot in jpeg mode. If you want to shoot RAW then I advise setting your camera to RAW+jpeg and comparing the two files after editing them and see if you need to shoot RAW. RAW is superior in every way except the amount of memory space it wastes and the fact that you have to edit it before sharing. Having said that I shoot in jpeg mode to discipline myself to get as many settings as possible right in-camera when shooting. if I did photography for a living I would shoot RAW.
I set my image quality to "large" and "fine". If you print out two photos, one taken in "fine" and one in "basic" they will look exactly the same - unless you edit them, and almost every photo needs a fine tweak of some sort no matter how well you have your exposure set - there are too many variables to get it right in-camera every time besides the limitations of the sensor itself.
A jpeg fine is like a thick slice of bread, it looks exactly the same as the thin slice [basic] from the top but if you put them both in the toaster [Photoshop] the thin slice will 'warp' while the thicker slice will handle it better. This means that jpeg fine has more information to 'throw away' to achieve the desired result when you edit. RAW is like a quarter loaf of bread in comparison, you can choose where you cut it before putting it in the toaster - within reason of course. :)
I leave my wb on auto as well. Auto settings are by no means perfect but they generally get the images close enough to be able to save them through editing later. If you set white balance manually you need to be fast enough to change it with changing light and have the memory [in your head] to do so. I don't have a good memory so I let the auto modes do some of the thinking for me.
I also have my iso set on auto. I set the actual iso manually to the lowest - iso 200 in this case because "lo-1" is a trick mode that loses quality. I have it set to be able to choose the maximum iso necessary to allow me to use my other settings with a minimum speed of 1/125th. That way it will keep increasing iso to prevent my shutter speed dropping below 1/125th because "you can fix noise but you can't fix motion blur!". What's the point of staying at iso settings for the best image quality if your shutter speed is so slow that the subject is a blur? In any case it's perfectly fine to have some noisy images in a set, many non-photographers will think it's artistic :)
I have my AF area mode set to 'dynamic' so it uses all the focus points for its calculations but I choose the main one myself. This prevents the frustration of it choosing a subject that is closer if it is in fully auto mode. I set the centre focus point to "narrow" because I find that when I have it at "wide" it doesn't focus as well, usually on something behind my subject.
First it will open the aperture to its widest, then it will lower the shutter speed, but not below that 1/125th sec that was set for auto-iso. Once it hits 1/125th sec it now only has one setting left, iso. It will then increase iso to the point where it reaches what it deems to be 'correct' exposure [I have a long chapter on this in my ebook]. So you may end up at let's say f3,5, 1/125th sec and iso 800 - but you couldn't go wider on the aperture, you don't really want to be shooting slower than 1/125th for motion blur so all that is left to save the shot is an increase in iso - or you can't get the shot. If it gets to its maximum iso [iso 3200 for my D90] it will do the only thing it has left to do and use a slower shutter speed which may or may not get you the image you wanted but there isn't much else you can do in a hurry.
Then I put my camera in shutter priority where you tell it what speed to use.
It's not about letting the camera do the thinking for you, it's about learning 'how' your camera thinks and using it to your advantage when time is limited. When you know why you choose these settings you are generally competent enough to shoot the same way in manual mode when time permits.
What about Aperure priority? I very seldom use it actually. perhaps indoors but most of the time I know that Program mode is going to choose settings very close to what I would choose while taking snapshots. If I'm indoors perhaps I may select the widest aperture my camera can go to but then again I know Program mode will do that anyway.
When I go to manual mode the settings for Aperture priority and Shutter priority are there as a base point to work from before turning off auto-iso if I have the time.
But there is another trick to turning off auto-iso [kinda] without digging into the menus - so you know it is ready to work for you again at the flick of a dial. Switch to Shutter priority and dial the speed slower than 1/125th sec.
As you dial the shutter speed slower the iso will drop back to 'base iso' [200 for the D90] and once it reaches this and you keep going slower it will start closing down the aperture to get the correct exposure. So basically you can set your camera to take a 1 second exposure at f11 and iso 200 even if auto-iso is turned on - without going into the menus. As soon as you flip back to Aperture priority or Program mode auto-iso will work exactly as before. :)
There is one other mode I use occasionally. Sports mode is handy when something happens in a hurry and you don't have time to change many settings. If I suddenly need to shoot something fast moving I simply flip to sports mode, there's no shame in using an auto mode if you actually know what settings it will choose and why - because it means you could choose the right settings if you had the time.
And just keep in mind that a jpeg could easily be published in a magazine :)
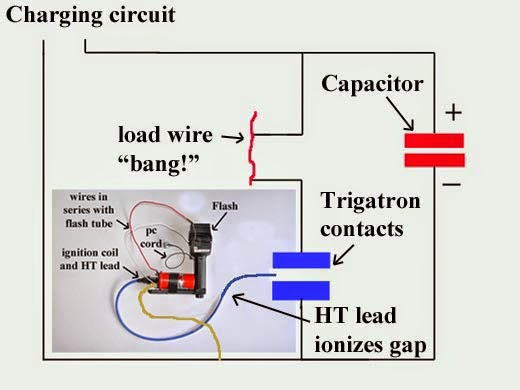
More dangerous – The Trigatron
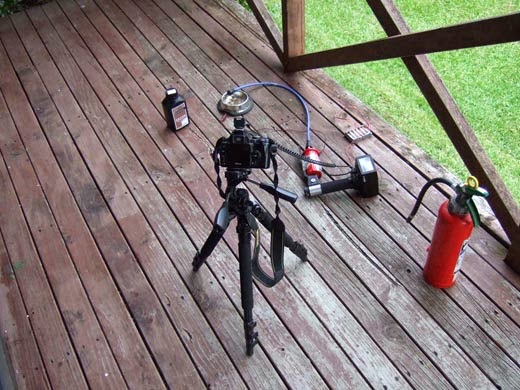
In my search for a fast switching method to fire up my experiments someone mentioned a spark-gap-switch on one of the forums. I went into an electronics store to ask if they sold them and was informed that I would need a special license to have one imported for me. When I replied that I would rather make my own I was warned that the FBI might start keeping track of what I do as the Trigatron is known for its use in detonating nuclear weapons. Well if that’s not what I’m going to use it for then I think it’s ok to make one because, after all, they do have other uses.
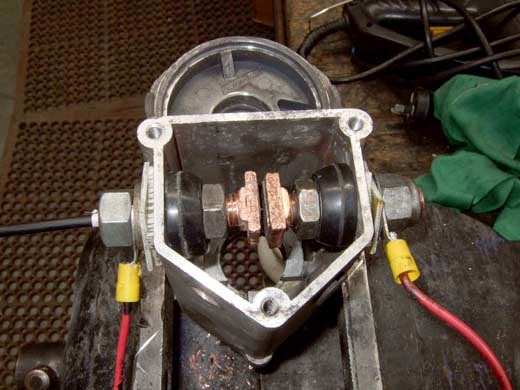
Do a search on “Trigatron” for a detailed description of its operation but for now the basic principle of the Trigatron is that you can switch very high voltages and currents without anything making contact. By having two contacts very close to each other, but far enough away to prevent arcing, waiting to switch a high voltage and current; all you have to do is use a third electrode to ionize the gap which enables the electricity to flow across the air-gap. The next image shows my first crude attempt at a basic Trigatron using a modified gear-reduction starter motor to hold the contacts where I wanted them. The spark-generating-coil provides my trigger spark and a 3300uf capacitor charged to 325 volts by an old flash is joined at either end of the contacts with a fuse in line that will blow if it conducts. This attempt failed probably because the gap was too large.

As can be seen from a close-up image my contacts are really large and rough, as is the trigger electrode, making it difficult to get them close enough for a 325 volt supply to jump the gap.

But I did eventually get it to work and the design shown below is what worked. The two red wires coming off the contacts were eventually connected to the large blue capacitor strapped upright to the flash. The blue line drawn in shows where the HT lead from the coil went.

This is the more complicated design to make for a Trigatron. Instead of adding a third electrode from the side, which ionizes half the gap as it jumps across, almost the entire gap can be ionized by having the third electrode running down the centre of one of the main electrodes. This way when the spark jumps across to the other side it creates a path for the lower voltage supply to rush across as well. The professional way of doing this apparently involves drilling a 1mm hole down the centre of the electrode and having an extremely thin, insulated wire, as the trigger electrode in the centre of that hole.
My skills do not include finesse. I found a 5mm plastic tube with a metal rod running down the centre, which used to be connected to the central locking system of a car I had worked on. This would have to do. I drilled a 6mm hole and inserted my “trigger electrode”.

The normal solenoid contacts of the starter motor were then modified to be able to go extremely close together making the gap for the 325 volts to jump as small as possible without too much fireworks and guide-dog training.
This is how it was all wired up.
As per the photograph with the sparking-coil and the solenoid contacts, once the capacitor was charged up with 325 volts from the old flash head all that had to be done was to take a photograph with the spark-generating coil connected to the camera. When the flash fired (away from the picture) a spark was generated that jumped the (small) gap thereby ionizing the air and allowing the capacitor to dump its charge across a 7.5 amp fuse, blowing it to bits. The disadvantage of a CCD sensor can be seen by the flare pattern created by the huge flash of light. The advantage is that this picture could actually be taken at 1/1000th of a second with this sensor.

A few seconds later we heard a “plop” in the office as our secretary finally lost her grip on the ceiling fan. It was like a gunshot going off. I will guess at some figures because there’s little chance of measuring the energy released in that small explosion. A 7.5 amp fuse normally takes about 15 amps to blow. I have no idea how this equates to a 325 volt supply because it may behave differently but even at 10 amps that would be 3250 watts, or 3 kilowatts, of energy in less than 1/1000th of a second.
This system proved somewhat unreliable because the next attempt was a misfire and the trigger electrode needed adjusting. It blew a 10 amp and a 30 amp fuse as well. The 30 amp fuse would have been close to 20 000 watts of energy. The fuse on the left is 10 amps and on the right is 30 amps. They looked a lot worse than the average fuse that has blown on a 24 volt truck circuit.

When we inserted a 40 amp fuse there was a really loud noise and the tip of the electrode was melted off in a fraction of a second. I definitely need to make some progress with this project. The Trigatron and I have some interesting photography to produce yet.
We have a metal recycler down the road from our workshop and they had a nice thick 25mm (1 inch) thick brass rod that will provide me with a powerful electrode. Once I get around to drilling the correct size hole and making a framework that can (safely) hold the electrodes the right distance from each other we will be back in business but the noise will be pretty loud. I’ve found that in situations like this wearing a high-visibility vest goes a long way because people don’t bother questioning you then. I once took some photos next to a river at a major park. I wrapped a sword in rags dipped in torch-fuel and set it alight while my model in a Samurai outfit held it out at arms length. We needed to be close to the river in case she caught alight if you can see the logic in that. I wore a high-visibility vest which immediately makes people think you are officially allowed to be there and they don't bother you.
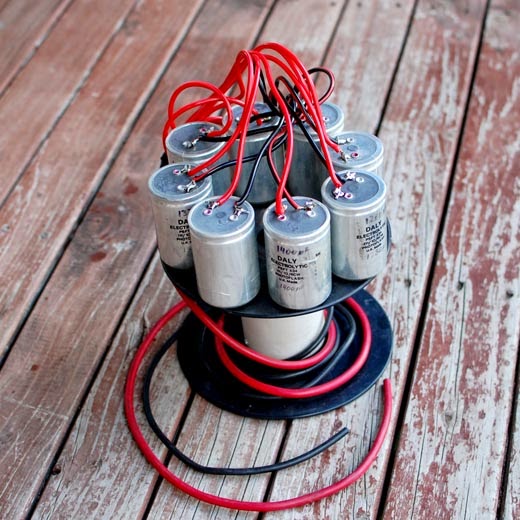
I can just imagine it now, these 8 capacitors all wired up in parallel joined to the Trigatron. I wonder what thickness wire will be destroyed and how much noise it will make before the helicopters start circling (again).
I still believe that besides the pure fun of photographing an explosive event there is perhaps a scientific use for this aspect of superspeed photography. Perhaps by my next book I will have discovered it; then again perhaps I will only have discovered another way to get the attention of the armed-offenders squad, who knows?
Anyway that’s as much as I have to share for now because, as mentioned, there is still a lot of “un-chartered territory” in this area of photography and my latest purchase just arrived and needs my attention.
How will I approach this project, the SCR and wire/gunpowder, the spark-generating-coil and Calcium Carbide, some other invention? We’ll see ;).

Dangerous stuff – The SCR
By now it’s possible that people may have worked out that I enjoy moments of destruction. Seriously, what I would probably rate as the best day of my life was when I wrote off my work van in a crash with a bus. The bus pulled out in front of me and I slid into the side of it at 80km/hr. I will admit to feeling the slightest bit of fear in the form of “What will the boss say about me smashing my work van?” but when I realized there was no more I could do to avoid it and it wasn’t my fault I just sat back and enjoyed the ride. A loud bang, smashing glass in all directions [until the windscreen wrapped itself around my head that is], most of the side windows were smashed, all the auto-electrical spares in my van flying all over the place-mainly toward my head. The heavy tool-box at the back ripped out of its holder and the ladder behind my head took most of the force before allowing it to rest up against my shoulder. After the fire department eventually cut me out I looked at the side of the bus and realized that if the bottom part hadn’t been so strong I would have slid into the luggage compartment and possibly left my head at the back of the van somewhere. Two weeks later I was still picking bits of glass out of my head. If I had to choose one day to re-live I know what it would be.

Due to the dangerous nature of this type of photography I’m not going to mention the part number of the SCR I used because anyone wanting to duplicate this type of photography should be competent enough to look it up and know what they are dealing with. If I remember correctly the one I am using is capable of switching up to 800 volts with an initial surge of 3800 amps. A rough calculation tells me that is 3 million watts of energy, or basically 3000 times more powerful than the average microwave which is why you need to be very careful with this type of photography.

And this is how I wired it up. If you can work that out there’s a good chance you are capable of using it reasonably safely but there’s no way I will provide a step-by-step guide for total beginners to fry their hearts.

Now for those who think I’m not capable of being artistic think again! This is what my first box looked like :D .

For my fist experiment I simply switched the capacitor across a thin piece of wire to see the wire explode. I’m using a 3300uf capacitor charged to 325 volts by an old flash.

The little D40 can do this all the way up to maximum shutter speed. 1/4000th at F8.

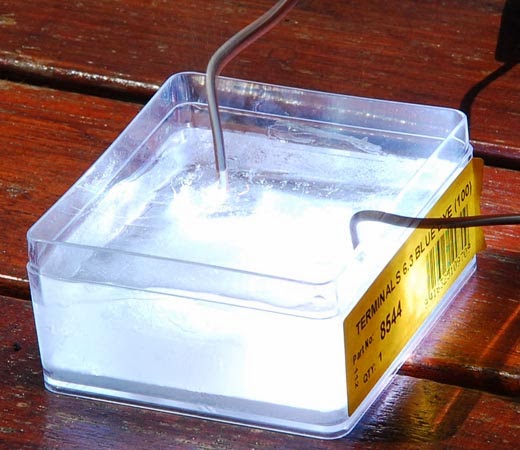
The next experiment was to see if a wire would still give a bright flash under water. And it did.

What happened next was both surprising and encouraging. This time I had the wire a little close to the side of the jar, I got my picture but the shock wave of the burst traveled downwards and blew the bottom of the jar out. The video can be seen under the title “SCR in water” on YouTube.

The resulting destruction of the jar was pretty impressive. I need to get some more jars I think ☺

I have since refined the design of my SCR switching circuit and now perhaps it has a better chance of clearing customs perhaps?
Nah!

The block of switches cut out all the dangerous wires so I can work with my subject – if I remember to switch them all off that is! With the right tools I think the circuit could be greatly improved and made more compact. The 12 volt battery doesn’t need to be so large, it was just the only one I had.
What else can be done with this system? Well it’s all up to your imagination I suppose. What would happen if we wrapped the exploding wire around a balloon full of propane gas for example? Nothing actually, the mixture is either too rich to ignite or the wire explodes so fast that it is all over before the gas manages to escape. Taken with the D40 with its 1/500th flash sync speed.

This all happened so fast that all I got was a balloon lit by the flash of the wire without time to burst.

The solution was a little scary to work with. I needed to put a candle next to the balloon so that when the gas escaped it had something to light it. It’s a little ‘iffy’ when you consider that we are also working with wires that have sharp ends that could burst the balloon while lighting the candle. It also required using 5 fps with the D90 because an explosion actually takes a long time to happen compared to how fast a wire blows up.

Enough of that, let’s get the gunpowder out. It’s actually not that scary to work with because it will only explode if confined. When you light it in the open it just fizzes.
In the first sample image it becomes apparent why Nikon don’t still make CCD sensors that can trigger flash at any speed. One of their disadvantages is the fact that they flare with bright light, not that you can’t control it once you know how. You can also see the green flash that the wire causes on the stone on the right.

If you place a stone on top of the gunpowder, and a bursting wire in the middle of it all, you get a flash, a loud ‘pop’, and the stone jumps up in the air.

What about water balloons? Well the biggest problem is the bright flash that dominates the scene and the fact that it is al over so quickly that there isn’t much time to see the balloon burst in all that light.
One solution is to use an optic trigger and let your camera’s flash trigger that with its pre-flash. You see, when you take a picture using flash, just before the picture is taken the flash fires very weakly so that the camera can do its measurements and decide what power to fire the flash at. So if you set your flash power to “-3” you won’t even see it in the final image, but the pre-flash that your camera/flash does to measure the final output will trigger the optic sensor of your SCR system and cause the wire to burst a fraction of a second before the picture is taken, that way you won’t see the flash. Of course if you want to use the flash to help freeze the motion that is also an option. Just be sure nobody is taking pictures of you doing this when handling the SCR because that could make it go off in your hands if they are using flash!
The following image was taken using the pre-flash to trigger the bursting wire just before the picture was taken, so there is no green flash of wire in the image.
Of course in a situation like this it is better to use the flash to freeze the motion. This is where HSS or high-fp flash (if your camera/flash can do it) is handy. The camera uses a trick mode, explained in my previous book, to fire the flash continuously at any speed. That way you could take a photo at 1/4000th of a second and blow something up just before the shutter fires and not have the bright flash of the wire bursting, but still have the camera’s flash lighting the scene at high speed. Of course with balloons there is always the variable of if and where a piece of rubber may be when you capture the image ☺ .

Another possibility, if you have patience, is to freeze the wire in ice and see what happens when it bursts. With my first attempts the rapidly expanding steam simply blew the wire out of the hole surrounding the plastic part.
If I had more patience I would do it again and tie a knot in the plastic part of each end of the wire so that it can’t be pushed out, perhaps the ice cube will split open for me. I have so many ‘shelved’ experiments waiting for a rainy day still as I continue my quest for a decent explosion.
Speaking of which, I think it’s time to start discussing the Trigatron, perhaps the answer to…… actually I don’t know what the question is but it sounded pretty cool didn’t it?
The spark generating flash
This is the point where I start mentioning disclaimers. Don’t do anything that I have done here, you could seriously injure yourself (if you actually survive). Capacitors store a lot of energy at high voltages that can kill you! These illustrations are for the interest of those who are fully capable of working with high/dangerous voltages and should not be copied by anyone.
When a flash is turned on and the capacitor is charged up the voltage from the capacitor is always making contact with the flash tube and the wires are always live, even after the flash has been turned off the capacitor holds a charge for a dangerously long time. There is a trigger wire just off-centre of the flash tube that ionizes the gas in the tube to fire the flash at different powers, depending on the time of the trigger voltage.
I will repeat this for emphasis: The capacitor is permanently connected to the flash tube and the wires at either end are always live even when the flash is not firing and for a a long time after it is turned off!
Now let’s have a look at a flash that has been modified to generate a spark when it fires.

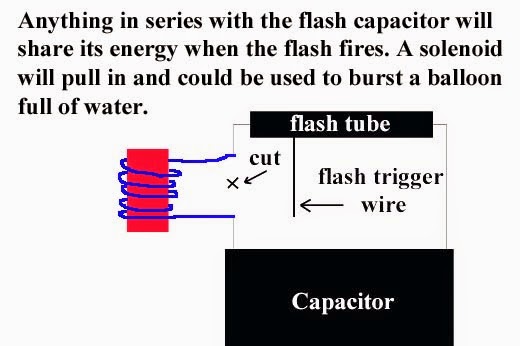
The basic principle involved here is that if an ignition coil is wired in series with the flash capacitor it will share some of the energy of the capacitor discharging through the flash tube. I’m not sure how much of that energy; all I know is that with most of the reasonably powerful flashes I get a spark equivalent to about 30 000volts. With one design I added a second capacitor in parallel with the main flash capacitor, which is similar to jump-starting a car with another battery. This gave me a spark that jumped a gap that was probably equivalent to about 50 000volts. Who knows, it’s impossible to actually measure that voltage so it is merely assumed based on a table of distances and gasses etc. In the image below it is jumping a small gap, it jumps a 5cm (2 inch) gap when required.

And when you consider the fact that the flash is firing pretty brightly as well it shows how much more power could be available for a spark if we didn’t have to share it with the flash tube.
Now for the wiring diagram, to show you what you shouldn’t attempt. If a flash head is opened, the old hammerhead style flashes are easier to get apart; you will find a tube with a wire at either end. These two wires are connected to the capacitor, which usually has around 300volts available - which is enough to blow off your fingertips while frying your heart. Starting to get the picture? Now if one of those wires is cut (either one) and two extension wires are connected up to be joined to either end of an ignition coil, the flash will still fire but some of its energy will be used up, in the coil to generate a spark, while the rest is released as light energy. The HT (high-tension) lead of the coil will need an earth wire and the side that it needs to be connected to will depend on which side of the flash tube you cut into and which way around the coil is connected. Play around with both options and see which gives the best spark.

There are obviously technical ways of working out which way around to connect the wires on the coil and which side of the coil to connect the earth lead to but generally it is much simpler to just try different variations and see which works best. Of course you could spend hours learning about the actual theory of it all and get it right by logically working out which way around it should be connected but there is always the possibility that the coil you decide to use isn’t wired up the way the text books suggest it should be. To me it’s just not worth the bother, decide what you want to do, connect things up, and see what works best – it’s worked pretty well for me so far!
So what is the purpose of this exercise then? Well for one thing you now have a tool that generates a 30 000 volt spark (approximate of course) each time you take a photo.
You could put the HT lead next to some water and put the earth lead inside the water.


If you are using a normal camera with a focal plane shutter you will be limited to the flash sync speed of your camera, usually around 1/200th of a second. I’m not going to go too much into the focal plane shutter, I did that in my first book “Photography Masterclass”, but I will make mention of a rather ‘special’ camera that is good for this type of thing.
In fact there are several models to choose from that have a CCD sensor. The Nikon D70/S, D40, D50 are the main ones I can think of. They are special in that they can sync flash at 1/500th of a second and faster if you trick them. They do not use a focal plane shutter that simply varies the size of the slit for speeds above 1/250th. Instead the whole sensor switches on and off to capture the exposure. This means that when the flash fires the entire sensor is exposed to the light every time, even at maximum shutter speed. They have disadvantages like sensor bloom (bright patches) when shooting into bright lights so they don’t make them like this any more ☹. I love these cameras and do a lot of my work with the D40. If you use a hotshoe adapter and pc cord the camera doesn’t know there is a flash connected so it doesn’t limit your shutter speed to 1/500th when you’re doing ‘different’ photography.
As an example of what I am talking about I’ll show a range of images of a spark taken at various speeds with the D40 and the spark-generating-flash system. This is what I call “superspeed” photography, the act of photographing an event that you have triggered by pressing the shutter release. Any camera can do this speed.

Only a camera with 1/500th sync speed can do this. Try it with a camera with a focal plane shutter and you will perhaps see half a spark as the slit of the shutter blocks half the screen. You could frame the image with the spark in the top half and capture it though, just the bottom half will be blacked out.

Now we go to higher speeds.

And the fastest shutter speed the D40 can do.

The way I see it this set-up can be used as a scientific tool. Photographing an event at a set speed that you know is generated when you press the shutter. I think it has a lot of potential.
Once I got this working I thought I had it made. Now I could start photographing gas explosions! What a disappointment though, it’s not easy making a gas explosion no matter how much the fuel stations get our hopes up. The air-fuel ration has to be pretty good or nothing happens. I had a bag full of petrol with a 30 000 volt spark jumping from above the liquid’s surface right down to the earth wire under the surface and still nothing happened. The mixture was too rich, not enough oxygen. Eventually I got a lame burst of flames from a reasonable mixture of air and gas but nothing to write home about.
I’ll just emphasize what people say about my photography at this point. The pictures aren’t very artistic but what’s the point of setting up fancy backgrounds before you even know if something will work? I know they are right, I look through my images and they all look pretty ‘mechanical’ but wait till I get the technique right before hurling any more accusations, once I have perfected my methods I start getting artistic, it’s just that I’m still working towards perfecting them but sharing what I have learned so far in the meantime.
My next idea was to buy some gunpowder, I had never worked with the stuff before and in hindsight perhaps the container shouldn’t have been so close to my experiment area. Why do people keep giving me fire extinguishers???
The experiment was a failure; a spark does not ignite gunpowder. Electricity simply looks for the easiest path to the earth connection, which involves pushing the granules of gunpowder out of the way to get there.

Occasionally I saw a glimmer of hope but knew this wasn’t reliable enough to start getting artistic.

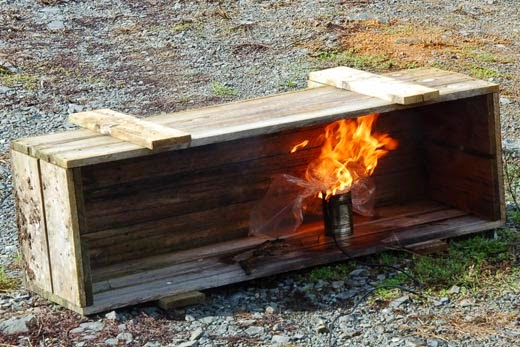
The next step was to use something that would slowly produce some gas in an existing oxygen rich environment. It’s a good thing my microwave volunteered for the job by not working a few days later when I wanted to use it. I had no hesitation in buying a replacement rather than trying to have it repaired, I had plans for it.

That was the best image I got from my D90 at 5fps but if you look up “fireball two” on YouTube you can watch a video taken at 400fps with the Nikon J1, another useful high-speed tool. This exercise involved throwing a teaspoon of Calcium Carbide in a can of water, which results in the release of Acetylene gas. The spark-generating-flash ignited the mixture as I took the first photo with the D90. I’m not after a loud noisy destructive explosion, just a nice fireball. I made some low quality screen captures of the video, which shows a few stages of the fireball.
First the flash fires and generates a spark igniting the mixture.

The flame front starts to spread.
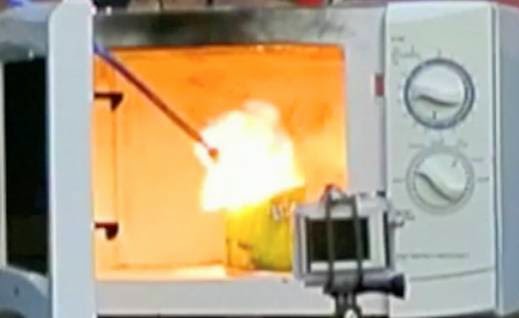
Eventually the fireball reaches out of the microwave oven.

The spark-generating-flash system provided me with some interesting images and may prove useful with exact air-gas mixtures but I needed something more reliable if I wanted to photograph a decent explosion. This led me to do some research and learn about the Silicon Controlled Rectifier (SCR).
Superspeed Photography
Something that I consider “my invention” because I haven’t heard of it being done before is “superspeed” photography. It is the act of photographing an event that would not have taken place if you had not taken the photograph. It can be faster than high-speed photography in that your camera’s fastest shutter speed can be used rather than using a 1 or 2 second exposure while relying on the flash to freeze the motion. It is also more reliable than using a fast frame rate on your camera because the event happens because you pressed the shutter, not because you were trying to photograph the event.
How does it work? Basically you are using the flash triggering circuit of your camera to make the event happen, so it happens as quickly as the action of your flash firing in many cases, and as reliably as the flash triggering circuit in your camera.
The flash triggering circuit in your camera is basically a switch that joins the centre and side pins of your flash together as you take a picture. In most reasonable cameras this can handle up to 250 volts while some can only handle as little as 6 volts so just check the specifications of your camera before trying any of this. A work-around if you’re not sure is to use an optic trigger and fire your camera’s flash to trigger that so you don’t have to worry about damage to your camera’s electronics.
Most cameras have a focal plane shutter which means that any speed faster than the flash sync speed (usually 1/200th or 1/250th of a second) involves the shutter becoming a slit that slides across the frame to limit the amount of light impacting on the sensor (‘sync’ is basically the synchronization speed of the camera and flash). So at 1/500th of a second instead of the shutter opening and closing in one movement the first ‘curtain’ starts opening and as it gets halfway the second ‘curtain’ starts closing resulting in a slit half the original size sliding across the frame and therefore half the light as at 1/250th affecting the exposure.
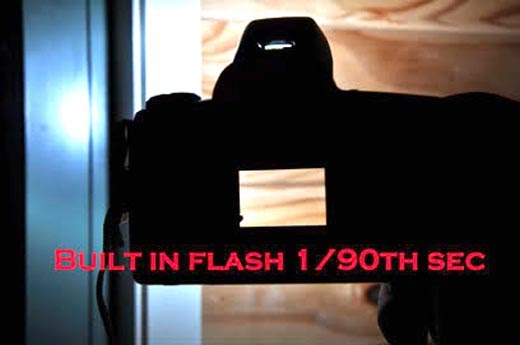
Here are a few pictures to make this clearer. An old Canon camera with the back pulled off has a flash sync speed of 1/90th of a second. When it fires you can see the entire frame.
But when we add an external flash and fire that at 1/1000th of a second the focal plane shutter has now become a slit to give less than 1/10th of the light of 1/90th meaning that when the first curtain reaches the bottom, and fires the flash, all that is affected by the flash is a small slit at the bottom of the frame. The flash fires as the ‘first curtain’ reaches the end of its travel. Most people who experience this problem with using a flash at high speeds report a dark part at the bottom of the frame meaning that their camera’s shutter curtains move from the bottom to the top of the frame.

The size of this slit will vary depending on the chosen shutter speed, how much faster it is than the camera’s maximum flash sync speed, and the ratio of those speeds. In other words if a camera can sync flash at 1/250th of a second then at 1/500th the slit will be half the size of the frame, at 1/2500th it will be 1/10th of the frame and so on.
This will be a major factor in any experiments you conduct, how much of the frame will be affected at high speeds, so try to stay within your limits in the beginning. If you have a camera like the D40/50/70 you can use any speed, which will be explained later.
So how does superspeed photography work then? The simplest approach is to modify a flash, which is very dangerous if you don’t know what you are doing, and even if you do! If you open the end of the flash you will find a tube with a wire at each end, and one near the middle. Do not touch these wires with your bare fingers! Always take the batteries out of a flash when working with it. I usually turn it on, fire it at full power and immediately turn it off again to try to dump the energy from the capacitor. Even then it is could still have a charge in it so you still have to be very careful with it. It’s handy to have a 240 volt light bulb with two wires coming off it to connect to those wires and discharge the capacitor. The scary method is to touch both wires with a solid piece of wire and watch the spark blow a piece of the wire off as it discharges.
Even after taking all these precautions it is still best not to touch any bare wires. I simply snip one wire (any one) at the end of the tube and join two longer wires to them to connect to whatever I am putting in series with it.
Here is a diagram to illustrate this concept.
My first attempt at superspeed photography was trying to burst a balloon full of water in daylight. The early exposures didn’t work because of the time it takes for a solenoid to pull in. I used a control solenoid from a diesel fuel pump and put a needle at the end of the plunger. As it pulled in it burst the balloon full of water. Due to the lack of control in the situation, a shaky stand with a balloon full of water and strong winds, I eventually had to drop to 1/30th of a second to give the needle time to reach the balloon. This resulted in something that looked like a double exposure as the original shape of the balloon was captured plus the burst a fraction of a second later. I would call this the first successful image of superspeed photography.

Summary: Superspeed photography involves capturing an event you have created by the act of pressing the shutter and with the right technique can be used at any shutter speed. From here on we will be using this technique for creating
moments of destruction.
The sound activated flash trigger.
The sound activated flash trigger
One of the most useful tools for high-speed photography is the sound activated switch. The one I use is sold as a “voice activated switching circuit” that has to be assembled first following their ‘simple’ instructions, Hmmmmm! Well I’m pretty sure that you can buy a ready made trigger kit just about anywhere in the world but most things cost a little more in New Zealand so I bought a kit and took the chance that it didn’t exactly need a human voice to trigger it. Well it worked after I put it together which is always a bonus, and it also triggered with any sound that was loud enough, so obviously it wasn’t ‘voice activated’ but rather ‘sound activated’.
The biggest ‘secret’ of modifying electronic circuits is that the small parts do the thinking while the bigger parts do the work. Have a look at the circuit of my sound activated switch for example. Pay particular attention to the white box thingy on the right that I have marked as ‘relay’.

We have a lot of little components that do all the thinking and calculating but they are the ‘brains’, not very strong but clever just the same. The relay is the muscle, not very clever but strong, because it is made bigger particularly for that purpose. So how does all the circuitry work to trigger the flash? Who cares? It just does! If you’re only interested in using it to help your photography then you don’t need to know and quite honestly I’d have to read up on it again [I forget easily] to remind myself how it works which, in any case, won’t make any difference to the final images now will it! All you have to remember is that if you want to modify something for triggering a flash you just have to find the final output of any circuit and connect the wires to that.
So we have the white box thingy and three contacts called “nc”, “com”, and “no”. They stand for “normally closed”, “common” and “normally open”. A photograph of a similar relay pulled apart will help to understand this easier.
In its rest position the normally closed contacts are touching the common contact. The blue thing on the left is the electromagnet winding which works the same way as what many of us learned at school, a winding of wire around a piece of metal makes a magnet when electricity is applied.

The components that form the brains of the circuit supply electricity to the winding contacts under the right conditions and the contacts, which are not in any way connected to the circuit, get pushed by a lever so that “common” touches “normally open” and so becomes a “closed” circuit.

I will repeat this for emphasis: The three contacts “nc”,”com” and “no” are not in any way connected to the rest of the circuit. This means that even if the board itself uses a 12volt supply, you can switch a 300volt feed with those contacts without harming your 12volt circuit. You don’t have to worry how many volts an old flash triggers at to use it with a relay. If, however, you need to know how many volts an old flash triggers at do a search “Botzilla strobe voltages” for a handy list of measured flash trigger voltages - very useful site.
We want to use the “normally open” and “common” terminals. Cut one end off a pc cable and join the two wires to those connections and when the circuit switches the relay the flash will fire, if it has the pc plug connected of course. If you want it to switch really fast, which you probably will, you can take out the mechanical relay and replace it with a solid-state relay.
What you will have to remember with a solid-state relay is that besides the fact that it has no moving parts and switches almost instantly, it is ‘polarity sensitive’. This means that what would be the “winding contacts” are electronic components that may require that they are switched with positive and negative on the correct terminals, unlike a mechanical relay which doesn’t care. Just be sure that you get a dc and not an ac relay if you do decide to upgrade to solid-state.
The switched side of a solid-state relay is often also polarity sensitive, as are the components inside your flash trigger circuit. This means that you will have to experiment with which way around you connect the two wires from the pc cable because it may work one way around but not the other.
The next step, if you want it to look fancy, is to put that circuit board in a plastic box and have the wires outside ready to be connected to your flash.

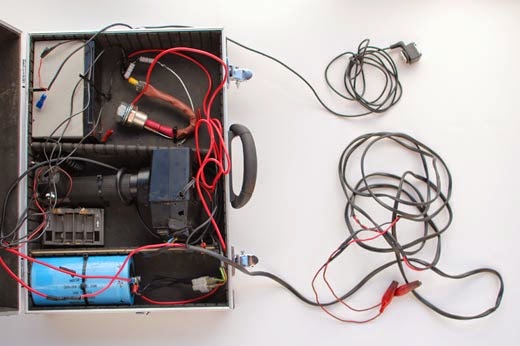
A good mechanical relay can switch in 5ms but that’s already 1/200th of a second and quite often that will be much too late to capture a smashing event. So let me share my modification with you. Now just keep in mind when you see my picture that “The shoemakers children go to school barefoot”. In other words I’m an auto electrician and there’s no way I am going to spend my precious time making a perfect looking unit when I’m not getting paid to do it! Just be grateful that I finally actually put it in a plastic box because before it was just a mess of loose wires before. My unit is modified for long distance work with regard to keeping away from water and being able to adjust working distances for timing, in other words – longer cords.

And here’s a close up of the solid-state relay and its wiring. At the top right is a picture of the top of the solid-state relay I used. I left the original relay in for a reason, it could be removed but sometimes it is handy hearing the ‘click’ so you know when something switched even when the flash isn’t connected. But be wary of having the mic too close to that click because it could keep switching itself on from that noise. If you hold the board up to the light you can see the shape of the original relay and the two switching pins on the opposite side of the switched “no,com,nc” pins. These are the pins you will need to connect the switched ‘input’ terminals of the solid-state relay to. And of course the output “load” terminals of the solid-state relay will trigger the flash via the pc cord. Just twist the wires onto the pins when you first connect it up because you may have to experiment with different configurations due to the fact that electronics often only switches electricity in one direction. If it doesn’t work one way try swapping the 1 & 2 terminal connections over, then the 3 & 4 connections until it triggers the flash. It’s too complicated trying to learn which way around they should go from the beginning for the once you will probably ever do it, so just test it first with the normal relay to make sure everything works and then do the Solid-state mod if you want the extra switching speed.

Now we’re ready for action! The red and blue terminals will plug onto a 12volt security battery, the microphone wires have been extended to keep them away from the box which was transmitting vibrations and interfering with my ‘progress’ by triggering the flash again from the sound of the relay switching, and the long pc cable makes it easier to keep the box away from breaking glass and splashing water.
My first attempts involved shooting balloons with an air rifle. The first step is to get the right working distance because it all happens so quickly that distance, which equates to timing, is crucial. Think about the variables we have: 1) the speed of sound, 2) the distance that sound has to travel, 3) the speed of the pellet, and 4) the distance the pellet has to travel to do its damage. The switching time of a mechanical relay would also have to be taken into consideration if you don’t upgrade to a solid-state-relay.
Find yourself a comfortable distance to work at without you or your camera gear getting splashed. Keep that distance constant. Here are some examples to illustrate the importance of this part of the equation. My first ‘shot’ involved the microphone right under the air rifle which was touching the balloon.

The sound of the air rifle going off triggered the flash so soon that I had a picture of a balloon with a pellet somewhere in the middle perhaps. I moved the microphone a little further away to give the balloon time to burst but it was all over so quickly it was pointless.

The solution was to stand further away to increase the variables available for adjustment. I stood 2 meters away and shot above the balloon so I could see the pellet’s position when the flash fired, and adjusted the distance the mic was away to get it where I wanted it in the picture. Take a photo and the pellet is in front of the balloon, move the mic further away and take another photo so the sound has further to travel to trigger the flash. Keep doing this until the pellet is where you think it should be in the photo. Eventually I had a balloon with a pellet just behind it in the picture.
Shooting the balloon full of water was a different story though because now we had the pellet hitting something that slowed it down a bit and all I got was a small split. That was another variable to consider.

At this stage I was still experimenting so the background isn’t too nice. Good excuse eh! Actually I just hadn’t put enough thought into it yet ☺
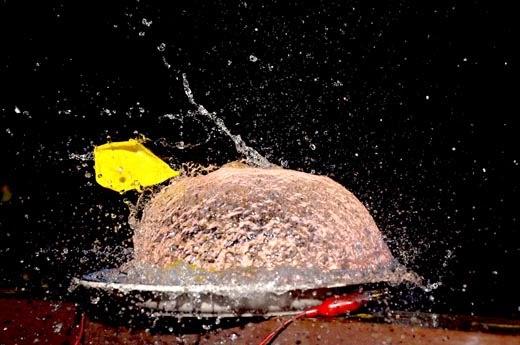
The above image was taken when the mic was about 2 meters away from the air rifle. When I moved it to about 4 meters away and took the next picture I stood and stared at the screen for a while, thinking there was something wrong with my camera’s display because I had never seen anything like it. As the balloon splits the rubber pulls the water up in a spray that looks a bit like a starfish.

Once we have our flash power, and distances to the subject and mic right, it becomes a mechanical action. Just remember to fill the balloons up to the same tension each time or another variable is created because they will split at a different speed if this isn’t done. Fill a balloon with water, place it on the ‘spot’ you have marked with a pen, camera on 2 seconds, F9 iso200, press shutter, pull the trigger and feel the thrill of looking to see what you have captured. At 1/11000th of a second flash time that’s 11000 slices of one second that you might have captured, it’s exciting to look and see which one it is!
There was a pattern with the balloons I was using but perhaps it depends on how they are manufactured. Each split I got seemed to be 4, 6, or 8 way tears. Here are a few of the more well defined splits to show this. In hindsight I should have had another flash on the other side of each balloon.

And here is a 4-way split.

Once you’ve had enough of frontal shots you can move to the side and perhaps use a remote to trigger the camera. BUT! You will have to adjust your distances all over again because as soon as you move, the amount of time the sound has to travel to trigger the flash changes. Shooting from an angle or the side reveals a different perspective on bursting water balloons altogether!

And one shot directly from the side.

If you have the time to play with you can also put food coloring in the balloon, though this can be quite tedious, and messy.
You may just be able to see the pellet coming out the back of the balloon, another reminder that having a second flash on the other side would have been a good idea.

Then there is the option of hanging the balloon by a piece of string for even better definition of the frontal splits. [this one made it to National Geographic :) ]

Here’s a good argument for having a second flash directly opposite the main flash in the front. To add another flash simply set it up with an optic trigger and the same power setting as the first flash, and it will fire at exactly the same time! In this image I half filled the balloon and shot the top away. It is a pretty unique shot in that I got a vertical split.

Once again we have the option of seeing the same photos shot from the side. If you have two cameras it would definitely pay to have them both set up to fire with a remote so you can get multiple angles of the same event.

And if you aim higher ……

When you’ve had enough of tying the balloons up you can put them back on a flat surface and half fill them and shoot the top away. By this time I had learned to shoot with the camera low down so that I have as little of the table in the photo as possible.

There’s always a different image no matter what you do.

There are also many different options to explore with a half-filled balloon. I eventually resorted to shooting down on them. Of course I had a few wasted shots before I adjusted the mic distance to the correct position once again. This is the ‘yellow ship’ picture.

So what do you do to protect your flash from all this water flying around? A 2 liter milk container is the solution. It isn’t pretty but it won’t be in the pictures, so who cares?

And of course remember to adjust your mic distance after each position change or you could end up with a photo of a pellet touching the balloon.

Let’s add another twist to the pictures. A mirror doubles our chances of seeing something interesting. Look at the back of that pellet in the top image.

Occasionally something strange happens. In this image I only got a hole in the front with the split at the back.

In the above image and the next one you can see the trail of the pellet leaving the balloon at the back.
Shooting two water balloons at once gets messy; I never had much success with that approach.

Of course you can do more than bursting water balloons with the sound activated flash trigger. On the circuit board in the picture I posted there are two adjustments. One is for sensitivity and the other determines how long the switch stays on for which means that you can make sure you don’t get a double switch within a certain time. If you place the mic so that it is near a piece of wood it will fire the flash when you drop something on the wood. A glass of water makes for some interesting images as well.

Always something different …….

If you really want some interesting images collect old light bulbs. You will need a lot of space, perhaps a plastic tarpaulin on the ground to catch the broken bits, safety glasses and trousers that cover the top of your boots so glass can’t get to your feet. Smashing glass moves very quickly so you will need faster speeds. The lowest power setting on an SB800 is 1/128th, which fires at 1/41600th of a second. This certainly freezes the motion. Keep in mind though that motion is never truly ‘frozen’ because there is always some movement at any speed, it just gets less as you use higher speeds. It finally looks well and truly ‘frozen’ when the movement in the image is less than one pixel on your sensor so it can’t be shown.
Here are a few samples of light bulbs breaking. If you hit the bulb normally it won’t look like this!

I learned that hitting the bulb straight down made for photos with a hammer almost touching the board. The trick is to almost ‘drop’ the hammer, which causes the bulb to smash and bounce upwards in one movement. This makes for a gap between the bulb and the board - just keep that in mind if you try it. The hammer has been edited out of this shot.

As mentioned previously you never know what you will get.

As can be seen from the last batch of images, by this time I had learned to get low down to the same level as the subject so that there is as little of the table as possible in the image.

Once again this image shows that dropping the hammer rather than hitting with it means that you don’t get an image with the hammer touching the board. Rather, you get some space between them.

If you really want to test your flash speed to its limits try shooting the bulb with an air rifle. That’s when you realize that 1/41600th is not the solution to every speed.

It can look quite impressive if you catch it right.

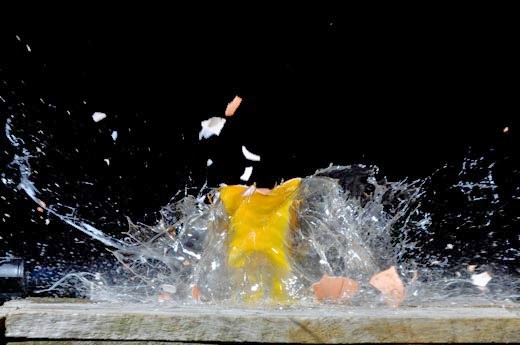
I eventually got a dozen eggs and started cutting them with a sword, very unimpressive. Finally someone on the forums suggested I try shooting some eggs. I replied that it probably wouldn’t look like much and set out to prove myself right.
The first image didn’t look impressive at all but I was surprised to feel something cold hit my face, and saw some yellow stuff on my camera. The yoke was on me, it had obviously moved further than the early stage of the explosion that I had captured.

The solution, when an event is captured too early, is to move the mic further away and try again. It looked a lot better and there is still much room for improvement regarding the background, but I feel kinda bad destroying food like that so I left it at that, the final eggsplosion.
All this time I had been using the sound of the air rifle to capture the events resulting from it’s firing. I decided to capture a few of the air rifle itself. The early photos didn’t look like much until I sprayed some anti-rust spray down the barrel before each shot. Look at the puff where the barrel supposedly seals halfway, showing the leaking seal.

Moving the mic a little further away meant that the pellet could leave the ‘puff’ behind and be more easily visible.
Early attempts
Early Attempts
My early attempts at high-speed photography involved a modified truck-starter solenoid. The Delco 40MT solenoid is quite easy to work with. I had to connect up a 24volt feed to the pull in winding using two large batteries. Then I drilled a hole in the back plate so I could push a long bolt up against the plunger. I connected the pc plug wires to the two large switching bolts at the back of the solenoid so that when it pulled in it would fire the flash. It wasn’t easy finding the right distance but eventually I got some photos with a light bulb breaking at high-speed.

The first one was simply messy.

Finally I got something reasonably presentable but the bolt didn’t exactly add to the image, it simply got in the way.

There was definitely room for improvement so I had to move on.
The simple switch
The simple switch
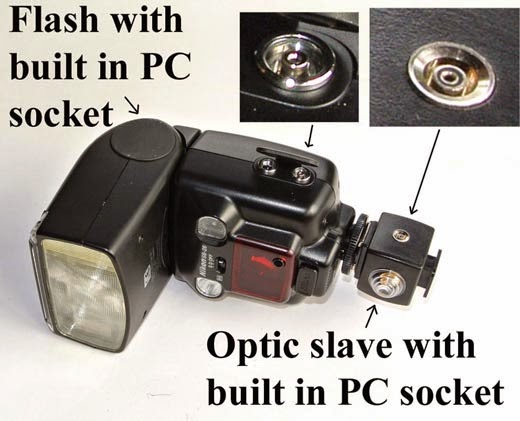
A lot of beginners are intimidated by the number of electronic pins, and the different settings available, on an external flash which is what will be needed for high-speed photography. The fact is that it’s actually very easy to switch a flash and make equipment to do so. Our first image shows what you may need to start with. We have a basic external flash, optic triggers [not essential], and a pc cable.

The ‘optic trigger for sunlight’ is simply a normal optic trigger like the other two, which has a tube glued onto it so that it can work in bright sunlight. Without the tube the sun interferes with its trigger signal, you’re not likely to need this but it is included just to show that it is possible to use them in sunlight. A pc cable is not for plugging into your computer so don’t worry if you use a Mac and are wondering what you can use! ☺ “pc” stands for “prontor compur” whatever that is supposed to mean.
Look at the base of the flash, you can see 4 pins in the one shown, plus one that looks like a pin but is actually for locking the flash on the camera. You can ignore all but the centre pin. Any flash you get will have a centre pin, which is almost all you need. I say ‘almost’ because any flash will also need to use the earth pin, which any flash you get should have as well. Here is a close up view of the earth contact and the trigger contact.
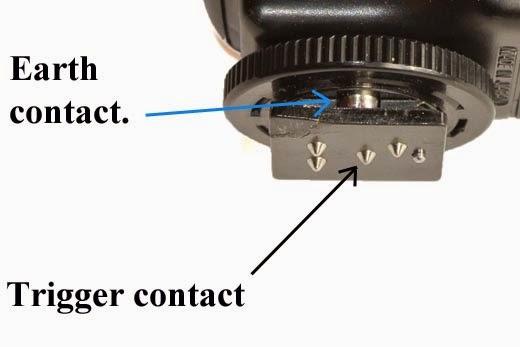
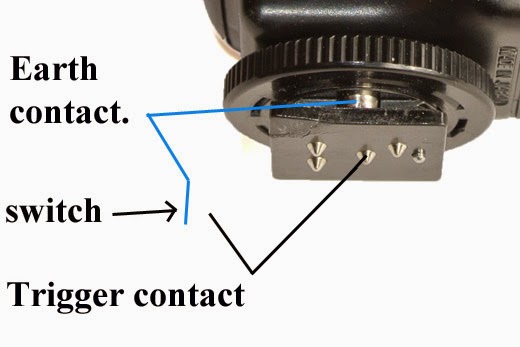
And that’s about it, all you have to do is take a piece of wire and touch those two at the same time and the flash will fire! Easy as that [unless you haven’t turned it on of course!] Here is another image to illustrate how simple it is, my drawing includes a ‘switch’ of sorts but simply taking two wires and touching them together would make the flash fire.
Some high speed images involve two wires connected to two thin pieces of foil glued to either side of a piece of paper behind an apple or whatever the subject is. When a bullet or arrow [must be metal] goes through the foil it effectively joins the wires together, via the foil, and makes the flash fire - simple and cheap but very effective.
Now the flash I have shown here and the optic trigger have something in common, a PC socket. You only need one PC socket, either on the flash or the trigger because they both end up being joined to the earth and trigger pins of the flash.
If you insert a PC cable into the PC socket [on the camera if it has one or an adapter if it doesn’t] you can cut one end off and you will now have two wires that will trigger the flash when touched together. This takes us to the basic switch setup. A micro-switch is a cheap and easy way to trigger the flash but takes a bit of skill to set up correctly. The board is hinged at one end. The spring keeps the board off the switch and the ‘stopper’ screw prevents it bouncing too much.

The switch has three contacts, “COM”, “NO” and “NC”. “COM” means “common” which is where one wire will always have to be connected. “NO” means “normally open” which is what you will most likely use, because this switch becomes ‘closed’ [joined] when it is pushed down. “NC” means, “normally closed” which you will seldom use because the contacts are normally joined until the switch is pushed and then they go open circuit, in other words it works backwards compared to the way we are all used to switches working. In the next picture we have a hotshoe adapter with a PC plug connecting it to a micro-switch.

If you mount the flash onto that hotshoe adapter, turn off the lights, place some objects on the board, and throw an orange you have your first high-speed image!

Fortunately it doesn’t end there. To start with you have a simple method of taking pictures that are very different to the average snapshot, but this method does have its limitations, as I’ll explain later.

The board has to be fine tuned so as not to do a double-bounce as demonstrated in the next image where it bounced up and came down with enough force to trigger the switch again, giving two exposures in one image. You can also see my badly chosen background in this image that could have been better if I had used the ‘blackground’ technique of shooting outdoors at night.

The safest way to avoid the double bounce involves a little more craftsmanship and a basic toggle switch that switches once and stays in place until it is reset. Just don’t smash another bulb without resetting that switch because it can involve a sudden increase in blood pressure when you realize you never had the flash firing when smashing your prize bulb, which was one of those rare extra-large models you scouted around for days on end to find for a special photo.

Once you set the switch in the up position, and have your flash charged and ready to fire, you can confidently hit the bulb, knowing that the flash will only fire once, like this!

And that’s as complicated as it needs to get if you just want to get started with some ‘smashing’ photos. With a little ingenuity all sorts of possibilities open up for someone wanting to experiment with high-speed photography, and moments of destruction.
Exposing high speed images correctly
High-speed photography involves a fair amount of manual settings if you want to make things easier and more predictable. You have time to play with or you wouldn’t be doing this, right? The different speeds that a flash fires at varies between makes and models but one basic fact is that they fire faster at their lower power settings. It makes sense because when they fire at low power they don’t need to release as much energy as at full power so it is all over within a shorter time.
As an example, the NikonSB800 takes about 1/700th of a second for a full power flash but at 1/128th power it fires as quickly as 1/41600th of a second. The SB24 fires at 1/11000th at its weakest setting which is sufficient for many subjects. The main point to remember is that you will be choosing a power output that gives you the speed you want, and then you will adjust the distance of the flash from the subject based on the inverse square law to get the correct exposure.
Here’s a basic diagram from my other book “Photography Masterclass,” to illustrate the inverse square law.

Basically the name of the law explains itself. If something is twice as far away then ½ squared means that the flash is only ¼ as effective, three times as far and we have 1/3 squared or 1/9th as effective. Of course this works in reverse as well. If your exposure looks a little dark, then moving the flash half the distance closer suddenly makes it four times as effective, your main limitations being the quality of light [assuming you want it diffused] and how close you can get without blocking the picture.
For my background I learned to use the horizon if possible, it’s so far away that the flash has no effect on it. I would set up my stand outside with nothing behind it basically, or whatever is in the background far enough away not to be lit by the flash.
To understand the concept of using a slow exposure without seeing any ambient [ambient = any light that isn’t flash] in the exposure we will have a look at a scene at night taken at the settings needed to see the fields in the background. This photo was taken at night!

Look at those settings again, iso800, F4 and 25 seconds to expose for the moonlight! What happens if we drop to iso200 rather? We make the picture 4X darker. Then we drop from 25 seconds to 2.5 seconds and make it another 10X darker. From F4 to F8 and we make it another 4X darker. Starting to get the picture? At iso200, 2.5 seconds and F8 the picture will be 4X10X4=160X darker! It will look like this – we now have a decent “blackground” for our high-speed images.

That’s our studio for now, we have our settings we need to use and once we choose a flash power, effectively our speed, to work with, we can adjust our exposure by moving the flash backwards and forwards, that’s what test shots are for before you do anything destructive. You could choose a half second, one second, or even a 5 second exposure to work with, depending how much time you need to cause the event after pressing the shutter release. Any of these settings outside at night will give you a ‘blackground’. The aperture is also fairly flexible so you will be able to experiment a bit. Just make sure you choose a shutter speed that gives you a comfortable time to work with, without being long enough for you to accidentally get a double flash that ruins the picture, or too short to capture the event when it finally happens.
Preface to "Understanding Explosure"
Preface
High-speed photography opens up many new opportunities to the keen photographer. Surprisingly it’s not as difficult as many may imagine. Usually the first response I get from someone who sees a nicely captured high-speed image is “You must have a really fancy camera.” My response is always “Give me your camera and I’ll take the same photos with it.” It’s not about spending lots of money on fancy cameras, and special equipment, it’s more about knowledge and the intelligent application of it when taking photos. Anyone who has a camera that can work in manual mode can take decent high-speed images. Even a cheap compact camera without manual settings can sometimes be forced into a mode that will allow for the photographer to get the job done – try this if you’re not sure, turn off auto-iso, flip to shutter-priority and 2 seconds and you’re ready to go! It’s as easy as that to get started so don’t go buying more gear just yet.
The first few chapters will deal with how simple it is to switch a flash, and some cheap and easy ways to do this to get you started. We’ll discuss bursting water balloons, smashing light bulbs and other ‘safe’ ways to get impressive photos with your camera and a few cheap accessories. Then we will discuss the sound activated flash trigger, something that will require about $20 outlay and perhaps a little more knowledge and confidence to put together, unless the units can be easily purchased ready made where you live, which is quite likely but will cost slightly more.
The second half of the book though, will involve something a little more dangerous that should not be attempted by anyone who does not know how to work with high voltages. When you start pulling flashes apart and working with capacitors you are working with voltages around the 200-600 volt mark, and extremely high currents due to the nature of capacitors and how quickly they can supply energy.
There are many YouTube videos on modifying a disposable camera to work as a Taser that will make your hand numb for several hours. Those cameras have a tiny capacitor smaller than the smallest segment of your little finger. The capacitors in a normal size external flash however, are a lot bigger and could possibly blow your fingertips off and fry your heart all in a fraction of a second, if you touch the wrong wires. All I will say is that you shouldn’t try any of this yourself if you are not a qualified electrician, and if you are then you need to take the proper safety precautions when manufacturing the equipment, unlike my back-yard endeavors.
To put things in perspective I used to grab the 30 000 volt electric fence around our workshop back in South Africa, just for ‘kicks’, it was designed to keep people out. One hand on the metal fence and the other grabbing the wire and it would throw me off in one swift break-dancing movement. The main difference here being the fact that those fences are a very low current in comparison to what a capacitor can deliver. I would never even think of touching the wires from a ‘mere’ 100volt capacitor even though it is ‘only’ 1/300th of the voltage of that fence, because it’s not the voltage but rather the current that can kill you, and a capacitor holds, and delivers, a lot of current. So be careful, this is highly dangerous stuff!
We will also discuss the ‘spark generating flash’ and the ‘wire exploding SCR’ rig. An electronic ignition coil in series with a flash capacitor can generate 30-50 000 volt sparks for some interesting effects in photos. And a silicon-controlled rectifier is a great way to switch high voltages and currents for explosive photography, and is really good for igniting gunpowder for some impressively ‘different’ photos. Our discussion on igniting a fireball of gas examines the difficulty of actually doing this since the correct air-ratio is needed to create an explosion, which actually makes me frustrated when I read about accidental explosions when it’s so hard to create an explosion on purpose!
This is where things need to actually slow down a bit, because many of the techniques involve really high speed switching which can leave you with photos of an exploding wire while you miss the actual fireball a few moments later. This is where taking videos and using fast frame-rates are unavoidable and things get a little more hit-and-miss.
Keep in mind the fact that I have been accused of not being artistic enough with my high-speed photography so take this book as a guide to the mechanical aspects of the subject for you to use as a foundation for artistic photography, not a book of amazingly artistic images. After all, most of the time I didn’t even know if something was going to work so there wasn’t much point in wasting time setting up an amazing background.
What you will need: 1) Any camera that has the ability to be set manually 2) a PC cord to connect the flash to a switch 3) If the flash does not have a built in PC socket you will need a hot-shoe adapter with a PC socket on the side. Some optic slaves have a PC plug built in and can be useful for other triggering methods to be explained a little later so it is worth getting one now.
Hopefully you are now chomping at the bit and want to get started, so without any further ado we will discuss the simple switch method of high-speed flash photography!
Ok, slow down a bit, first we need to discuss how to get the correct exposure, if that’s ok? If you already know that then skip the next chapter and start getting the neighbors worried!
Exposure compensation
Once you have an idea what correct exposure is and how the different metering modes work you will realize that no metering mode is perfect in every possible situation. A metering system doesn’t know what the lighting is like. It sees something white and assumes it is gray in bright light so it backs off the exposure. It sees something black and assumes it is gray in dark lighting and increases the exposure – all it knows is ‘average gray.’ Though Nikon’s color matrix metering generally knows a little more than that, spot and centre weighted and most other cameras’ pattern metering systems only know one thing ‘average gray’. And that is what they aim to achieve regardless of whether the subject is black or white or anything in between.
This is where exposure compensation comes into the equation. Once you have chosen a mode to work in and are comfortable with judging when exposure is correct you can start using exposure compensation to fix images that aren’t properly exposed. If you take a picture and can see it is definitely not exposed correctly then all you need to do is push the little +/- [EV or ‘exposure value’] button on your camera, usually near the shutter release button with Nikon DSLR’s, and turn the back dial while holding that button down [depending on how your particular camera works] and take another picture, of course. If the results are still not where you want them try another adjustment until it’s right. As you do this more often you will find it easier to get close to the correct exposure with only one adjustment.

Remember that a ‘stop’ is either twice as much or half as much light depending which way you make the adjustment. Most cameras are set to dial in 1/3 of a stop increments while some are set at ½ increments. If your camera has the ability to choose between the two then it is best set at 1/3 increments because that is generally how the shutter speed adjustments work as well. That way if you are in manual mode and adjust the shutter speed 3 ‘clicks’ then you know that adjusting the aperture 3 ‘clicks’ in the other direction will result in the same exposure. Once you have made an adjustment the rear LCD, and usually inside the viewfinder, shows a +/- symbol to remind you that the metering is set to behave differently.
Let’s go back to the image of the white paper half in sunlight and half in shade as an extreme example.

We’ll start by adding a reason to ‘take sides’ between light and dark. Let’s add some subjects. This is what they looked like on the page as the clouds blocked the sun for a while.

Once the sun came through the clouds again I used aperture priority mode and took a picture and the camera chose 1/800th sec. at ISO 100.

The first image was taken with the active focus point on the roach on the right of the image. I had my camera in matrix metering mode and moved the active focus point over to the mantis on the left and the metering system realized my subject was now in the dark but was not prepared to change by too much. As I’ve noted in the past Nikon’s matrix metering system seems to have a cap of 2 stops that it is prepared to change in any situation. [With most of their newer models, that is]. Centre weighted metering would have maintained exactly the same exposure for both images.

So now we see that the shutter speed dropped to brighten the dark areas and this resulted in totally blown highlights. In this situation we have no choice, we have to blow the highlights to get our exposure right for the subject we have selected. Since the subject is still too dark, remembering that it is on a white surface, I dialed in ‘+2’ EV compensation so the shutter speed dropped to 1/50th sec [two extra stops of exposure gives us 4 times as much light so we go from 1/200th to 1/50th]. Our histogram now shows the whites in the shaded area as just above ‘average gray’ judging by where the histogram is sitting. We can see the thin spike on the right of the histogram representing our blown out whites on the right side of the image.

I dialed in another two stops of compensation resulting in a total of ‘+4’. Two stops down from 1/50th is 1/12.5th. Shown as 1/13th. Now the left hand whites are shown as a hill sloping down to the very right of the histogram, just before the spike caused by the right hand half of blown out whites. Right where it should be to give us a white with some details and expose our subject correctly as well. This has come at the cost of a total loss of detail on the right hand side of the image.
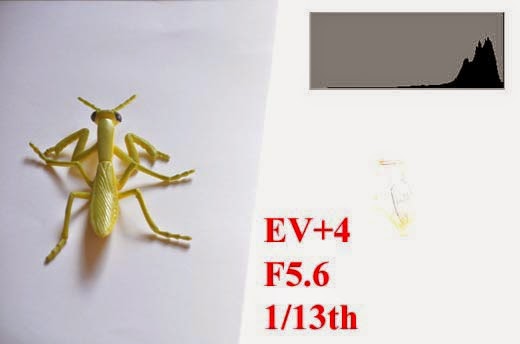
These are the decisions we have to make in a really high contrast situation. Which is the subject? What are we prepared to sacrifice to get the subject correctly exposed and what options do we have anyway? The camera doesn’t know what our subject is and where it is in the image except what it figures out based on the focus points [when in matrix or pattern metering mode]. The camera is disadvantaged in the fact that it cannot read our minds [some would be a shorter read than others]. That is why cameras have EV compensation buttons, to be used when necessary!
Here is a more realistic ‘real world’ example, an image I took a few months ago of Lake Waikaremoana [try to say that without hurting yourself] in New Zealand. When I checked the histogram it was bunched up to the right a little too much and had a thin spike at the far right meaning ‘white with no detail’, Matrix metering saw all the dark greens and overdid the clouds a bit while trying to expose properly for the greens.

As with previous situations like this, with this particular camera and metering system, I’ve become accustomed to dialing in compensation of ‘-0.7’. Hold down the ‘+/-’ button and turn the back dial until the exposure shows ‘-0.7’ which is usually two out of three lines on a scale showing 1/3 increments, it’s actually 2/3 which is 0.666666 , rounded off to 0.7. Some cameras have an LCD screen on top that actually shows ‘-0.7’. In this particular case I felt that it was more than 1/3 over, perhaps close to 1 stop over, but 0.7 gave me a happy medium to try, and in this case it worked first time.
It may not look much different on screen but the first image would be rejected from a stock library because the spike indicates an imperfect exposure. The second image was accepted when submitted.
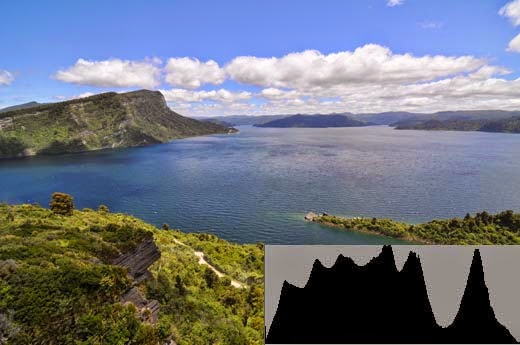
Note how the histogram is no longer bunched up against the side, no spikes showing overexposure? And if you analyze it for a while you start seeing what the different ‘hills’ represent. The solitary hill on the right is predominantly bright sky and possibly includes the brighter reflections on the surface of the water. Histograms very seldom look like the ‘ideal’ the meter aims for because we seldom photograph something totally plain so it pays to have a look at the histograms you are getting and to learn to read the information and decipher the exposure in varied situations. Just remember ‘pitch black on the left, pure white on the right and everything else in between’.
Of course it’s not always negative compensation that we have to use, it depends on the scene and what ‘fools’ your metering system when it tries to produce an ‘average gray’. Here’s a shot with a lot of white in it, a bright lighthouse and clouds in the background. Our metering system decides things are too bright and backs off the exposure resulting in an image with a lot of detail in the whites but underexposed grass and blue sky, which should be our real ‘average gray’ tone.

Look at the ‘hills’ just left of the centre and to the right of centre. That’s supposed to be whites, we have a lot of white in the scene and that should give us a hill touching the right but instead it’s to the left meaning that the image is badly underexposed.
In this case it was so badly underexposed that I dialed in ‘+1.7’ and could have made it ‘+2’ or even ‘2.3 but anyway it made the image look more like it should have been, ‘next time’ I will check the resulting histogram more closely but it’s still a huge improvement on the initial image where any metering system would be fooled by the massive amount of bright light in the image.

Have a look at the resulting histogram above. See that gap on the right that we could still use? There is also a small spike at the end, which is the unavoidable spike of the bright light reflecting off that window. There’s no way we can save that because it’s the sun’s reflection and it is totally acceptable because a reflection like that can’t have detail. Think about the image in the chapter on exposure with the house with the bright white wall. If the rest of the image is properly exposed we sometimes have to ignore a minor imperfection elsewhere, we can’t always get everything properly exposed, due to the limits of the sensor’s dynamic range we dealt with earlier as well. The sun and its reflections in a normal image will always be a spike of white with no detail but we can still use that space on the right before that to push our histogram over even more and expose further to the right. As mentioned adding another 1/3 to 2/3 of a stop of exposure would brighten the image further without throwing away much detail and would result in a more accurate exposure and better image quality and print. The resulting histogram would fill that gap.
Musical Histograms
2 Musical Histograms
Many people take a while to grasp the concept of reading a histogram and working out what it should look like, without actually realizing that they have seen something very similar for years. How so?
Many sound systems have a graphic equalizer display that shows a graphical representation of the various frequencies of a piece of music. When you listen to the music playing and watch the bars bouncing up and down you notice that the pattern changes all the time. When there is a heavy beat the bars on the left jump up and down, when there is a high pitched noise the bars on the right jump up and down, a human voice makes the centre part move upwards and when there is a whole lot going on the entire pattern is busy jumping up and down. It’s a bit like watching a silent video with the histogram showing. If the video is correctly made and properly exposed then the histogram will still keep changing its pattern, it will never be wrong, it will just be showing different patterns for the variety of different scenes.
Here is an image of an equalizer pattern with a wide variety of noises going on, it looks very much like what a good photograph’s histogram would be like for an evenly lit scene.

But as mentioned there is variety in music and in photos, not all histograms and equalizer patterns will look the same, but that does not mean they are wrong, we have to view them in their context. If a scene has a lot of darkness in it the histogram will move to the left, as with the sound of a menacing drumbeat in a movie when something is about to happen, the pattern looks like this just before the shark fin surfaces.

It’s all bunched up on the left, which is simply an accurate representation of what was going on at the time. If you were to take a photo of green grass and the histogram looked like that then you have done something wrong because it would need to be near the centre, but if it’s a picture of some dark brown soil within the same scene then the histogram would be correct.
The next image shows the pattern made by a singer with a high-pitched voice [right bump], and some low music in the background [left bump].
A few minutes later in the movie there was an explosion with a lot of shouting and screaming which almost filled the entire pattern.

As with music and video, our histogram may assume an average look in a very busy scene and then we can judge our exposure based on its position. But we have to view histograms in their context because our camera’s meter is like an equalizer that wants everything in the middle, even when it should rather be to the left or to the right. It assumes that we have an average scene every time when it meters, and ends up trying to make all our exposures the same, which often ends up in incorrect exposures. The chapter on exposure compensation goes more deeply into this.
So if you have exposed correctly and the image looks right don’t think that it must be wrong because you don’t see the ‘ideal’ histogram pattern, a drum beat or cymbals will show at opposite ends of the equalizer pattern but that doesn’t make them wrong, they are supposed to sound different and be at opposite ends of the pattern. It’s the same with photographs, there are a wide variety of subjects and some of them have histograms very different from what is often shown as the ideal histogram pattern. Something that has a lot of darkness in it will bunch up to the left while lots of white should show a bump on the right. Check the histograms of your images regularly so that you learn what they look like, in the same way that you get used to watching the equalizer pattern showing differently for a variety of music. Only when you have learned to put the histograms in their right places can you start trying to compose masterpieces because you’ll never be able to do it before your instruments are properly tuned.
02 Exposure
Exposure
Here is an image and its associated histogram just to show a few basics.

This is what the histogram looks like. A spike on the left representing black with no detail, a spike on the right representing white with no detail, and then everything else goes in between them with darks on the left, lights on the right and mid tones in the centre.

Here are some more images, along with some more histogram basics, that should help to explain why it is so difficult for manufacturers to write a program to give correct exposure in all situations. Have a look at this image and the resulting histogram. On the left of the histogram we have the dark part of the image and on the right we have the light part of the image, shown as two separate ‘hills’. So what is this picture of?

It’s actually a sheet of white paper so everything is white to a person looking at it. But half of the paper is in sunlight and the other half is in shade. This shows that there are many situations where the camera has to make compromises while trying to achieve correct exposure. Don’t think that the histogram gets the tones the right way around according to how the picture looks on the screen, it always shows darks on the left and lights on the right
So what if we only take a picture of the area of the paper that is in the sunlight, or just in the shade? What will the exposure and histogram look like? Like this, for BOTH!

This could be either the sunlight or the shade image, they both came out the same.
When it’s a neutral color the camera’s meter aims for ‘average gray’, somewhere near the middle. The camera does not know the difference between gray in normal light, white in shade or black in sunlight! How could it? Something to think about when trying to work out why your camera does what it does.
So how do we get ‘correct’ exposure in an image when we have such a variety of lighting to deal with? In a later chapter ‘exposure compensation’ will be discussed which deals with correcting the exposure when the camera gets it wrong, which is actually quite often!
What happens when we introduce a third variable to the scene, besides the shadow and sunlit areas of the paper? Let’s introduce a black lens cap in the shaded area. Compare the histogram of this image with that of the first image. Do you notice how the left peak has dropped a little, but we now have an extra spike to the very left of that? Why has this happened? Well the lens cap is now using up some of the space in the shadow area, so that original left peak has less of that particular tone to represent, but since the lens cap is even darker than the shaded paper it creates another hill on the very left, which represents black with very little detail.

Next we add something lighter than the shadow area but not as light as the sunlit part of the paper. Can you predict where the histogram will show this? Somewhere between the left and right peak perhaps? Definitely! It now shows as a rather spread out mound between the two, because it is a more average tone.

Try to predict what the histogram will look like if we introduce our black lens cap to the shadow area again. Where will we see it represented on the above histogram? Obviously if it is darker than the white paper in shade it must fall to the left of the left hand peak once again. And here we have a more complete histogram! On the very left we have the spike of the black object in shade, after that we have a nice sharp hill representing the white paper in shade, then we have a shallow hill with a little peak on it representing the various tones of the leaf, and finally we have the steep hill on the right representing the white area in sunlight. Be aware that there will be some overlapping of tones between the different subjects on almost any histogram so they are not always this clear-cut to interpret.

A large hurdle to overcome is understanding ‘how the brain sees’ compared to how the camera sees, because often a lot of confusion is created by taking a picture and seeing that it looks nothing like how you expected it to look. Take the picture of the white paper in sunlight and shade for an example, both sides looked white to me when I looked at it on the table. It’s all about something called ‘dynamic range’. This is basically the limit of what you can see from the darkest part to the lightest part of an image.
A camera’s dynamic range is very limited compared to how our brain ‘sees’. The example that best illustrates this is when you look at a bright window and see something like this and stare at it for a while

It all looks pretty ‘normal’ to you until you look away and blink and you see this pattern when your eyes are closed………

Why does this happen? Perhaps the simplest way to describe it is that your brain/eye combination ‘fixes’ the situation by darkening the bright areas so that the exposure looks right for the inside and outside at the same time (realistically it is caused by a chemical (rhodopsin) in the retina of your eye being depleted by the bright light), and when you turn away and blink it takes a while for it to ‘reset’ the pattern it created in the process which is why you see that shape. It involves a lot of hard work for your brain because the scene has a high dynamic range, from very dark all the way to very bright. Let’s have a look at how the camera sees this scene. When I take a photo of it I get this …..

The camera’s sensor doesn’t have enough dynamic range to capture the dark interior of the house and the bright exterior all in one image. The window has become totally white with no detail and is therefore beyond the limits of the sensor’s dynamic range. Your brain-eye combination has a very high dynamic range, it can see the bright exterior and dark interior all in one scene.
Now here is another image of the same scene with the exposure set correctly for the outside light.

Now the outside detail can be seen but the inside has become totally black with no detail. Once again capturing detail inside and outside at the same time is beyond the dynamic range of the sensor – you have to choose what you want to have correctly exposed because what you can capture, all in one exposure, is limited by the dynamic range of the sensor.
Try this: Set your camera to spot metering and find a scene like this – bright window and dark room. Turn off auto ISO, use ‘A’ mode or ‘Aperture priority’ and take a photo with the window in the centre of the frame – spot metering is only seeing the light outside. Now take another picture with the window to the side and the centre focus point of your camera on the wall inside. You will see a vast difference in the exposure – in one image the light outside the window will look right while the wall inside is close to being black, and in the other image the wall will look right while the window is white.
Now when we compare these images how much difference is there between the shutter speeds chosen by the camera? Well compare 1/5th sec to 1/250th sec. 250 divided by 5 = 50. The light outside is 50 times brighter than inside! Of course depending on conditions where you are there will be variations in this experiment so don’t think there is something wrong if you don’t see a difference of 50 X .
The initial image in this chapter is the result of combining the two images in Photoshop – it’s not nice to have to resort to editing images to get what you want but sometimes it is unavoidable. This combining of the two images results in a rather crude ‘High Dynamic Range’ or ‘HDR’ image.
Another solution would be to use flash to light up the inside of the house while exposing correctly for the outside light.
So what about an image where the light is even enough not to have to do this and what does the camera’s metering system aim to achieve to obtain ‘correct’ exposure?
Try this: put your camera in ‘P’ mode. Use centre weighted or matrix/pattern metering mode and take a picture of something in an even lighting arrangement – perhaps a dull color or simply a patch of grass or blue sky with nothing else in the image. Now check your histogram.
Side note: If anyone asks why you are using Program mode tell them ‘P’ stands for ‘Professional’ but if you reach the stage where you don’t need to use it then you tell them ‘P’ stands for ‘Panic’ because it tries to do everything for you besides turn on the flash. (That’s why it’s best to stay away from the fully automatic modes because you never know when it will pop the flash up when you don’t want it to.)
With an even patch of dark blue sky the histogram should look something like this: Very low contrast, because there is very little difference in the tones of the scene.

The camera’s metering system is designed to try and produce an average gray in each scene whenever possible. When reading a histogram always bear in mind the context of the image. On the very left is ‘black with no detail’ and on the very right is ‘white with no detail’. ‘Average Gray’ does not necessarily mean the color gray but rather an average tone in any color.
Using the same settings I took a picture of the (dry) grass in front of me. Now there’s a difference! It may not look like it but there’s a lot going on in this image all the way from black with no detail to white with no detail (The two spikes at either end) and everything in between. That’s why you have to look at the context of the image and resulting histogram. The meter may aim for an average reading and this has a hump in the middle in the same place as the image of the sky and both exposures are correct, but this one has a lot more contrast, there is information at both ends of the histogram, that’s what contrast is all about!

Now we move lower in the sky where there is some haze on the horizon and a greater contrast in colors, not as much as with the grass but still a lot more than previously. I used the same exposure settings as the previous images. We have some of the neutral tone blue sky near the top of the image, white clouds at the bottom which account for the high spike on the right of the histogram, and the tip of a tree and some darker looking cloud which accounts for the flat line at the very left of the histogram.

Now we add some more variables to the scene by once again using the same exposure so we know the different parts of that histogram will stay in the same place. Because I have gone to wide angle the original white spike is lower because the white clouds are a smaller part of the final image. Look at the picture for a while and try to work out what that spike is at the very right of the histogram.

Remember ‘white with no detail’? Look at the lower left of the image and the bright reflections off the white paint of the closest house. This is the tricky part of reading histograms, what do you ignore? In this case the histogram is really good for the rest of the image and the bright part of that house is not all that important to the image so the exposure is good enough for that scene. If you were to back off the exposure to show some detail in that white area the rest of the image would be under-exposed. If you print it out as it is there won’t be any detail in the white part of that house but if it’s for your own personal use and the white part of that house isn’t important to you then don’t worry about it, the rest of the image is well exposed. Either way, it would be rejected by an image library, due to that spike, but there isn’t much other option besides going back when the lighting is better or taking two different exposures and blending them later in Photoshop. Our original example shows this concept quite well.

What about the picture where the window is correctly exposed? Let’s have a look.

As we can see there is a large spike of ‘black with no detail’ on the left, a very small amount of ‘correct’ exposure across the middle of the frame, a small hump of ‘white with detail’ of the clouds and a small spike of ‘white with no detail’ on the right.
So which image is correctly exposed? It depends what you wanted to show and what is important in the image. If you only wanted to show what it looks like inside then the first image is ok. If you wanted to show someone how nice the weather was outside then the second image is fine. If you are taking pictures for a real estate agent to show how nice the house is inside and outside then you had better either combine the images or add flash inside with the outside correctly exposed.
And when the images are combined we have a more even histogram – not perfect by any means due to the spikes at either end but sufficient to illustrate what we are aiming for and give an idea of what the various areas of the histogram mean


An example of a potentially good looking scene that never had the right light and is harder to look at is this shot of a mountain at the beginning of New Zealand’s best one day walk, the Tongariro crossing. It takes a bit of work for your brain to even out the lighting in this image and even more so when you are there in real life trying to adjust your eyes for the bright sky and dark shadows.
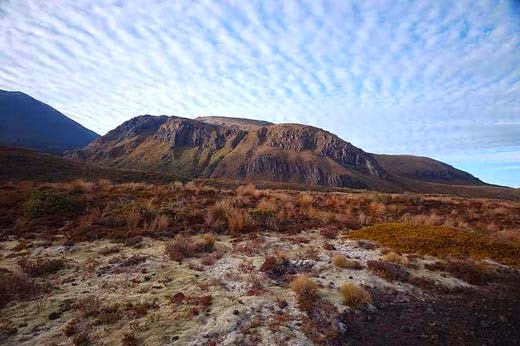
Once you come to grips with the fact that the camera doesn’t capture exactly what you see due to its limitations, and learn to work around those limitations, you will be closer to capturing the images you have envisioned in your mind before pressing the shutter release.
05 Sunny 16 rule
The Sunny 16 rule
Basically this rule states that on the brightest, clearest, sunniest day you could possibly get, if your ISO and shutter speed are equal your aperture will need to be at F16 to get the correct exposure. That is, if the subject is in the sunlight of course. Believe me I had to mention that last part because I’ve learned that very little is ‘obvious’ when someone is learning something new.
How or why does this work? First of all we have to establish a standard to base our measurements on and an easy way to do this is to make our ISO and shutter speed the same because no matter what their value, as long as they are the both the same, the exposure will be the same at any given aperture. Let’s assume the brightest day possible and you are at F16. If your ISO is 100 and your shutter speed is 1/100th sec you will get the same exposure at that aperture at ISO 200 and 1/200th sec, ISO 400 and 1/400th sec, ISO 8000 and 1/8000th sec and so on.
Think about it for a while so it becomes clear in your mind. At ISO 100 and 1/100th at F16 you have correct exposure on a ‘sunny 16’ day. If you stay at F16 and change your shutter speed to 1/200th sec you are halving the amount of time you allow the light into the camera. But by changing your ISO to 200 you are doubling the exposure you had at ISO 100. 2 X 1/2 = 1, which is the same exposure. And the same with any other combination that is different to ISO 100 and 1/100th sec, as long as the two numbers are the same they will give the same exposure with any combination because any number you multiply the shutter speed by divides the exposure but if you multiply the ISO by that same number it multiplies the exposure by the same factor, giving the same result.
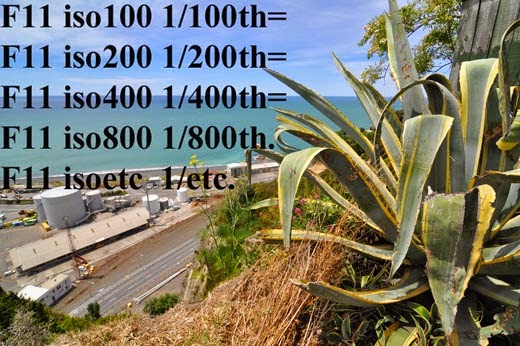
So why did I use F11 in my example image when we are discussing the sunny 16 rule? Because I want this number to stick in your mind, since you will very rarely see an F16 day! Depending where you live of course, but just because there is sunlight between the clouds that does not make it a sunny 16 day. Even if there is not a cloud in the sky, if you can see a little haze on the horizon it will most likely be an F11 day because that haze is also above you and is obstructing the sunlight above you as well.
Try this: Set your camera to manual mode and turn off auto ISO. Choose an equal shutter speed and ISO, let’s say ISO 200 and 1/200th sec. Point your camera at the blue sky or green grass, or just move it around in random directions and see what aperture the camera chooses. [Don’t point it at the sun!]. Most of the time if the sun is shining you will see apertures around F11, very rarely will you see F16.
So what? Why does it even matter if the camera is going to choose the right settings for you anyway? Even though the sunny 16 rule was developed a long time ago and used a lot for manual shooting that does not mean it no longer has any use! It serves as a pivotal calculation point.
For example imagine you want to use flash for an outdoor event tomorrow but don’t know what the effective range will be for the flash. Now you have a pivotal value to use to calculate the worst-case scenario for the day. In bright sunlight you need powerful flash because you are competing with the sun and have to use smaller apertures to block out the sun’s light, which also blocks out the flash’s light.

So the worst-case scenario, if we are at ISO 200 and the camera’s maximum flash sync speed [1/200th in this case], is the brightest possible day at F16. So you set up your camera and flash the night before and manually dial in ISO200 1/200th and F16, and with the flash attached you see what settings it tells you that you will have. The flash is telling us, before we even venture outdoors, that with a 24mm lens we will be able to work at up to 2.7m at these settings, for full power flash! Cool eh? [My wife is Canadian eh!]
Then we change to a more realistic setting of ISO 200, 1/200th and F11, which is the brightest day we are most likely to get, and the camera now tells us we will have a safe working distance of 3.8m. F11 lets in twice as much light as F16, which benefits our flash power. [Mathematically speaking, due to the inverse square law, discussed later, twice the power gives us 1.4X the working distance because that will spread the flash over twice the area. 1.4 X 2.7m = 3.8m].

And then we set it to an optimistic ISO 200, 1/200th and F7.1 just to see what we might have to work with if it’s fairly cloudy. 6m is what we get and though it’s unlikely that we will be at F7.1 it only took a few seconds to check with the knowledge we now have of the sunny 16 rule!

Another application it has besides working out flash distances involves shutter speeds. Suppose it is a sporting event and you haven’t a clue what speeds you could be shooting at. Now F16 is a best case scenario and you optimistically calculate from ISO 200 1/200th and F16. You won’t shoot at F16 so you move to F8 to help your calculations and, knowing that F8 lets in 4X as much light as F16, you now know that at ISO 200 you can shoot at 1/800th sec on a sunny 16 day. Then we go to a more realistic F11 day, which is half as bright [F11 lets in twice as much light as F16, so there would have to be half the maximum light available to have an F11 day], so we know that instead of being able to shoot at 1/800th at F8 we would have to drop to 1/400th on an F11 day [With half the light available]. But of course lenses go wider than F8 so at F5.6, one more stop wider, we could achieve our 1/800th again. It takes a bit of mathematics but it’s good to know it’s not impossible to work out, ahead of the time, what you may have to work with, and even if you can’t do the maths yourself you now know what the pivotal settings are and someone will be able to work it out for you perhaps.
01 Preface
Preface
I once read a book on how to develop a perfect memory, but I forgot what it said? For that main reason when I learn something I need to understand it fully so it sticks in my mind or I soon forget what I read. There are many other books on photography out there, some good, some not so good. Many of them skim over the basics and move on to showing off images the author has taken along with brief descriptions of how they were achieved and sometimes also deep discussions on how they would look if different settings were used. When the reader ventures out and tries to create similar images they are often disappointed and wonder what they did wrong since their images are not coming out as described in the book they just read and in their frustration they resort to buying more books and magazines and spend many hours asking questions on the photography forums, of which there are many, but still don’t make meaningful progress.
My thoughts are that a book on taking pictures can obviously be better explained and understood using an assortment of descriptive pictures, in steps, that lead the reader’s thoughts in the required direction so as to make the information stick in their minds. That may sound like a really basic concept but you’d be surprised how long it takes some people teaching the subject to grasp it, if ever – use pictures to explain how to take pictures. I will add that the forums are a good place to learn if you ask the right questions. This takes years for many and sometimes some never really get a full understanding of what they are trying to learn if they miss out on a really good discussion somewhere and the thread eventually gets lost in cyber-space. This book is an attempt at sharing what I have learned over the years, much of it on the forums, as well as what I have discovered through my own tests and experiments.
First the basics will be covered, what is correct exposure? How does what the camera captures differ from ‘how our brain sees’? How do you read histograms and use exposure compensation to correct them? What is ‘exposing to the right’ and how does it affect ‘noise’ in an image? What is the ‘Sunny 16’ rule and what practical application does it have for us today? How does flash add to the image and what tests can be done to understand this?
Besides these basics we will also learn some ‘photography wisdom’ – tips for beginners, how to deal with ‘Photographing weddings for friends’ and perhaps what many beginners hope to have as a goal ‘Making money from photography’. I won’t mention the part about photographing explosive events because that might freak some people out.
My sincere hope is that many beginners will save themselves countless hours of aimlessly shooting hundreds of images without knowing what they are supposed to be trying to achieve, or how to achieve it if they do, by giving them a deeper understanding of the basics, along with some tests they can do for themselves to further understand the subject. Hopefully this will make the whole experience much more productive and fulfilling, and more like a hobby than a frustrating battle with understanding technology.
Search Posts
Featured Posts
Featured